Soundcard interface (including PTT) for Baofeng UV5R and other cheap handhelds
I was interested in using a couple of Baofeng UV5R radios for VHF/UHF digital amateur radio communication. This includes packet radio using the direwolf TNC as well as newer and more efficient protocols such as ARDOP.
I had two problems when trying to set up the radio/soundcard interface. My laptop soundcard doesn't work very well, so I wanted to use a cheap USB soundcard. The USB soundcard I have only provides a microphone input and not a line-level input. As a result, the received signal level going to the soundcard had to be very low (of the order of a few 10's of mV). The Baofeng radios are not very good at providing this low signal level because the only audio output on the radio is intended to drive a speaker with audio levels of a volt or two. Adjusting the speaker audio level to match the mic input via the Baofeng audio control was very tricky due to the sensitivity of the soundcard. I needed to be able to adjust the audio output of the radio with a reasonable margin for error.
My second problem was how to reliably do transmit/receive switching. The ARDOP protocol requires the radio to switch between transmit and receive with latencies of the order of 100 mS. The Baofeng's VOX mode is notoriously slow to drop out, hanging on for a few seconds in most cases. This is far too long for ARDOP exchanges, and so I needed a reliable way to switch the radio's PTT circuit.
Looking around, I found several possible solutions, but none was a complete soundcard interface for the Baofeng UV5R. The best of these were from VK7NTX and ZS2EZ. The VK7NTX link gives a nice description of how to do PTT with a Baofeng radio. Both the VK7NTX and ZS2EZ links describe audio interfacing to a soundcard line input port, but don't have details on interfacing to the soundcard mic input.
Using ideas from the VK7NTX and ZS2EZ pages, together with a bit of tinkering, I was able to develop a reliable soundcard interface for the Baofeng UV5R that had fast PTT switching and greatly reduced sensitivity to the radio's audio knob position for reliable reception of data. My soundcard interface is shown below (click the thumbnail for a larger version).
The transmit audio circuit uses a 1:1 audio isolation transformer to isolate the Baofeng 3.5 mm sleeve from ground to enable the PTT circuit to work. Resistors R1 and R2 are used to attenuate the transmit audio level so that the deviation of the transmitted signal is ~ 3 kHz for a 1200 baud packet signal at maximum speaker gain on the soundcard. Careful initial tuning of the deviation by setting R2 is required in order for your signals to be reliably copied by others.

The PTT circuit uses resistor R3 to limit current through the PC817 optocoupler LED. When the serial port RTS line goes high, the LED turns on and pulls the collector of the optocoupler low, shorting the sleeve of the 3.5 mm UV5R connector to ground and asserting PTT on the radio.
The receive audio circuit includes capacitor C1 to block any DC voltage from the soundcard (usually used for powering electret microphones). Resistor R4 is chosen to attenuate the audio signal from the Baofeng speaker (2.5 mm connector) to a level compatible with the soundcard microphone input. Assuming a typical soundcard microphone input impedance of 15 kOhms, a value of 82 kOhms attenuates the voltage by a factor of a approximately 6.5 (or 16.25 dB). Using this value of R4, together with a soundcard mic gain setting of between 7 and 10 in alsamixer, I obtained reliable reception with the Baofeng audio knob set anywhere between the 6 and 9 oclock positions. I also added a header (J1-J2) which can be shorted to bypass R4 if I want to switch to a soundcard with a line input instead of a mic input.
The soundcard interface works well with the 1200 baud packet radio and ARDOP protocols. For the TNC, I use direwolf by WB2OSZ for packet and ardopc by G8BPQ for ARDOP. I would also note that this interface could be used with a hardware packet TNC.
References
Setting up a Cloud at Cost node with a fresh Ubuntu image
This file documents how to install a fresh ubuntu image on a CaC node. The ubuntu image is taken directly from ubuntu.com. However, they only provide images over http (not https).
It also documents how to set up full-disk encryption with remote unlocking via ssh.
I used several good references to develop this set of instructions. They are listed at the bottom of the page.
I would also note that none of this material is particularly CaC specific. Rather, the approach will apply to all modern Ubuntu server installations.
Install a fresh Ubuntu image
Get the mini.iso for the desired distribution:
wget -c "http://archive.ubuntu.com/ubuntu/dists/<desired_dist>/main/installer-amd64/current/images/netboot/mini.iso"(here <desired_dist> is e.g. yakkety)
Mount the mini.iso as a loopback on your local system.
sudo mount -o loop mini.iso /mntCopy /mnt/linux and /mnt/initrd.gz to a webserver someplace.
cp /mnt/linux /var/www/linux
cp /mnt/initrd.gz /var/www/initrd.gz
On the CaC node (built according to standard procedures), download the linux and initrd.gz files to the /boot partition.
wget -c "https://<your_web_server>/linux"
wget -c "https://<your_web_server>/initrd.gz"
Open up a console to the CaC node from panel.cloudatcost.com. Steps 6-11 need to be performed on the console.
Reboot the CaC node (click the alt-ctl-del button in the upper right of the console screen) and hit escape several times to stop at the grub2 screen on the console. Then enter "c" to get to the grub prompt.
At the grub prompt, enter the following:
grub> linux /linux
grub> initrd /initrd.gz
grub> boot
This will boot you into the ubuntu installer. Follow the installation process using the node's network parameters from the CaC panel.
When prompted to repartition the disk, go ahead and repartition using full disk encryption. You will need to enter a password for the FDE. Go ahead and enter a throwaway password. This will be replaced later once the secure FDE boot process is established.
At this point, install only the system utilities packages (already marked for installation) and the openssh-server packages.
Complete the installation. Reboot the node, type the FDE password into the console to decrypt the disk.
You now have an original ubuntu image installed. You can ssh into the node and do work. However, you will have to decrypt the FDE disk at boot time via the (unencrypted) console each time you reboot. This is problematic for two reasons: 1) console access is easily lost, and 2) the FDE password is sent in cleartext over the network.
Set up remote FDE decryption
To set up secure FDE decryption via ssh at boot time, follow these steps on the CaC node:
Install the dropbear and busybox packages.
sudo apt-get install dropbear busybox(required on ubuntu yakkety, maybe others) Copy the /bin/busybox binary to /usr/lib/initramfs-tools/bin. This is required because the binary in /usr/lib/initramfs-tools/bin does not work with the current unlock script.
sudo mv /usr/lib/initramfs-tools/bin/busybox /usr/lib/initramfs-tools/bin/busybox.orig
sudo cp /bin/busybox /usr/lib/initramfs-tools/bin/busybox
Copy the system's ssh server keys to /etc/dropbear-initramfs, converting them to dropbear format in the process. Also, remove old dropbear keys.
sudo /usr/lib/dropbear/dropbearconvert openssh dropbear /etc/ssh/ssh_host_ecdsa_key /etc/dropbear-initramfs/dropbear_ecdsa_host_key
sudo /usr/lib/dropbear/dropbearconvert openssh dropbear /etc/ssh/ssh_host_rsa_key /etc/dropbear-initramfs/dropbear_rsa_host_key
sudo rm /etc/dropbear/*key
Create a /etc/dropbear-initramfs/authorized_keys file containing the public key(s) that you want to authenticate to the CaC node with when decrypting the FDE.
sudo vi /etc/dropbear-initramfs/authorized_keys
...
Edit /etc/initramfs-tools/initramfs.conf and add the following line after the DEVICE= line (using params from the CaC panel for this node).
IP=<server ip address>::<gateway ip address>:<netmask>::<ethernet device name>:nonee.g
IP=192.168.122.192::192.168.122.1:255.255.255.0::eth0:noneUpdate the initramfs.
sudo update-initramfs -u -k allReboot the node and test the ssh connection:
ssh -i /path/to/your/private/key root@<cac_ip_or_fqdn>You should be prompted to type "cryptroot-unlock" and enter the FDE password.
Once the decryption is successful, type "exit" to allow the CaC node to reboot.
Change the FDE password
At this point, you can reboot your CaC node securely. However, you should change the FDE password. To do this:
Add a new key to the luks partition.
sudo cryptsetup luksAddKey /dev/sda5Delete the old key from the luks partition.
sudo cryptsetup luksRemoveKey /dev/sda5Next time you reboot, you can unlock the FDE with a fresh password that hasn't been sent to the console over the network in the clear.
Important Reminders
The dropbear ssh private key is stored unencrypted in the initramfs. As a result, it is possible for anyone who has physical access to the disk to copy the ssh key and spoof the node.
While the node is running, the luks disk encryption key is stored in ram. As a result, it is possible for anyone who has physical access to the machine to copy the encryption key and decrypt the disk image offline. The only way to assure this does not happen is to maintain physical security over the node hardware at all times. This is a problem with all vps installations, and not just with CaC.
References
A secure, hidden tahoe-lafs grid
This note documents how to deploy a secure, hidden tahoe-lafs grid over the tor network. The storage servers are hard-coded so no introducer is required. All storage servers are accessed only through their onion address, and the onion addresses are protected using stealth access mode. Thus, a cookie for each storage server in the grid is included in the client's torrc file.
The possibility of doing this was first discussed in the comments following a posting on the tor blog. Below I summarize the steps required to actually implement the secure, hidden tahoe-lafs grid.
In what follows, we will assume that the storage server configuration directory is located at ~/.tahoe-server and the client configuration directory is located at ~/.tahoe. Modify the instructions below according to your installation. The easiest way to create these configuration directories is to use the create-node (for the servers) and create-client commands. On each server node, run tahoe create-node --hostname=fixme .tahoe-server. This will generate a skeleton configuration for the server. Similarly, the command tahoe create-client .tahoe wil create a skeleton client configuration. You will modify these configurations as described below.
Storage server configuration
For each storage server, the first step is to create a tor hidden service that points to the local tub.port. Include the following lines in the storage server's /etc/tor/torrc file (modify the HiddenServiceDir and HiddenServicePort parameters as appropriate for your installation):
HiddenServiceDir /var/lib/tor/tahoe-server/
HiddenServiceAuthorizeClient stealth server_1
HiddenServicePort 3457 127.0.0.1:3457
and restart the storage server's tor daemon.
To determine the onion address for the storage server, cat /var/lib/tor/tahoe-server/hostname. The output of this command will look something like:
adfmcm3mkfkx8fds.onion fdjkhasz734mxhuaiTUjfs # client: server_1The first string in this line is the hidden service onion address, and the second string is the stealth cookie. The comment following the # symbol is just to remind you which storage server these credentials correspond to.
Repeat this process on each storage server node. You will get a unique onion address and stealth cookie for each storage server. Save these for later
The ~/.tahoe-server/tahoe.cfg file for each server node looks like this:
# -*- mode: conf; coding: utf-8 -*-

# This file controls the configuration of the Tahoe node that
# lives in this directory. It is only read at node startup.
# For details about the keys that can be set here, please
# read the 'docs/configuration.rst' file that came with your
# Tahoe installation.


[node]
nickname = node_l
reveal-IP-address = false
web.port =
web.static = public_html
tub.port = tcp:3457:interface=127.0.0.1
tub.location = tor:adfmcm3mkfkx8fds.onion:3457

[client]
# Which services should this client connect to?
introducer.furl =
helper.furl =
#stats_gatherer.furl =

# Encoding parameters this client will use for newly-uploaded files
# This can be changed at any time: the encoding is saved in
# each filecap, and we can download old files with any encoding
# settings
shares.needed = 3
shares.happy = 7
shares.total = 10

[storage]
# Shall this node provide storage service?
enabled = true
#readonly =
reserved_space = 1G
expire.enabled = true
expire.mode = age
expire.override_lease_duration = 3 months

[helper]
# Shall this node run a helper service that clients can use?
enabled = false

[connections]
tcp = tor
The onion address set in tub.location must match the onion address you obtained for that storage server node. The port must also match that set in the HiddenServicePort parameter. Adjust parameters such as nickname, lease expiration, and reserved_space as appropriate for your installation.
Start each storage server with tahoe start ~/.tahoe-server, modifying the server directory as appropriate. The storage grid setup is now complete and all of your storage servers should be running.
Client configuration
The first step is to configure the client's tor daemon so that it can find and access the storage server onions. Add the following lines to the bottom of /etc/tor/torrc on the client node (one line for each storage server):
HidServAuth adfmcm3mkfkx8fds.onion fdjkhasz734mxhuaiTUjfs # client: server_1
HidServAuth zxlkj33klsjfu3nf.onion lajdf8z33nmnnxuiufjlds # client: server_2
...
The strings following the HidServAuth parameter should match those you saved for later in the server configuration instructions above. Restart the tor daemon.
The next step is to create the ~/.tahoe/private/servers.yaml file. This file contains hardcoded information on how the client will connect to the storage servers. In order to enhance the privacy and anonymity of the grid, no introducer or helper nodes are used. The formatting of the servers.yaml file is critical. Be sure to follow the formatting exactly as shown here (two spaces per indentation).
storage:
  v0-lkzjkleloafjko3kfldskojfiiui34ljkkljfadkljfdjkljfakl:
    ann:
      nickname: server_1
      anonymous-storage-FURL: pb://hxmipb3sfebovhev2mwbumtcn276ph6z@tor:adfmcm3mkfkx8fds.onion:3457/7pqmhbq2s2m4ms72zaz23jixd64wt34h
# storage
  v0-lj3lmziojprmklzxpoguik33jkfl889lzjfskljfkslfjkdslffd:
    ann:
      nickname: server_2
      anonymous-storage-FURL: pb://syw73rxtygpomuhtsqzqdhhtoopwo7gp@tor:zxlkj33klsjfu3nf.onion:3457/c4iahx6xbpzrxrn5rjnc4rie23gcglk3
# storage
...
The strings beginning with v0- are the public keys of each of the storage servers. These are in ~/.tahoe-server/node.pubkey. Be sure to just include the part of the key beginning v0- in the servers.yaml file. Replace each storage server public key in servers.yaml with your storage server's public key.
The anonymous-storage-FURL's beginning with pb:// should be replaced with the FURL's from your actual storage servers. The FURL for each storage server can be found at ~/.tahoe-server/private/storage.furl. Apparently, the # storage comment lines between each storage server's information are required, so be sure to include these.
The client's ~/.tahoe/tahoe.cfg file should look like this:
[node]
nickname = client_1
reveal-ip-address = false
web.port = tcp:3456:interface=127.0.0.1
web.static = public_html
tub.port = disabled
tub.location = disabled

[client]
introducer.furl =
#helper.furl =
shares.needed = 3
shares.happy = 7
shares.total = 10

[storage]
enabled = false
reserved_space = 1G

[helper]
enabled = false

[connections]
tcp = tor
Edit the client nickname parameter as appropriate, as well as the web.port and shares.* parameters.
Finally, start the client with tahoe start ~/.tahoe.
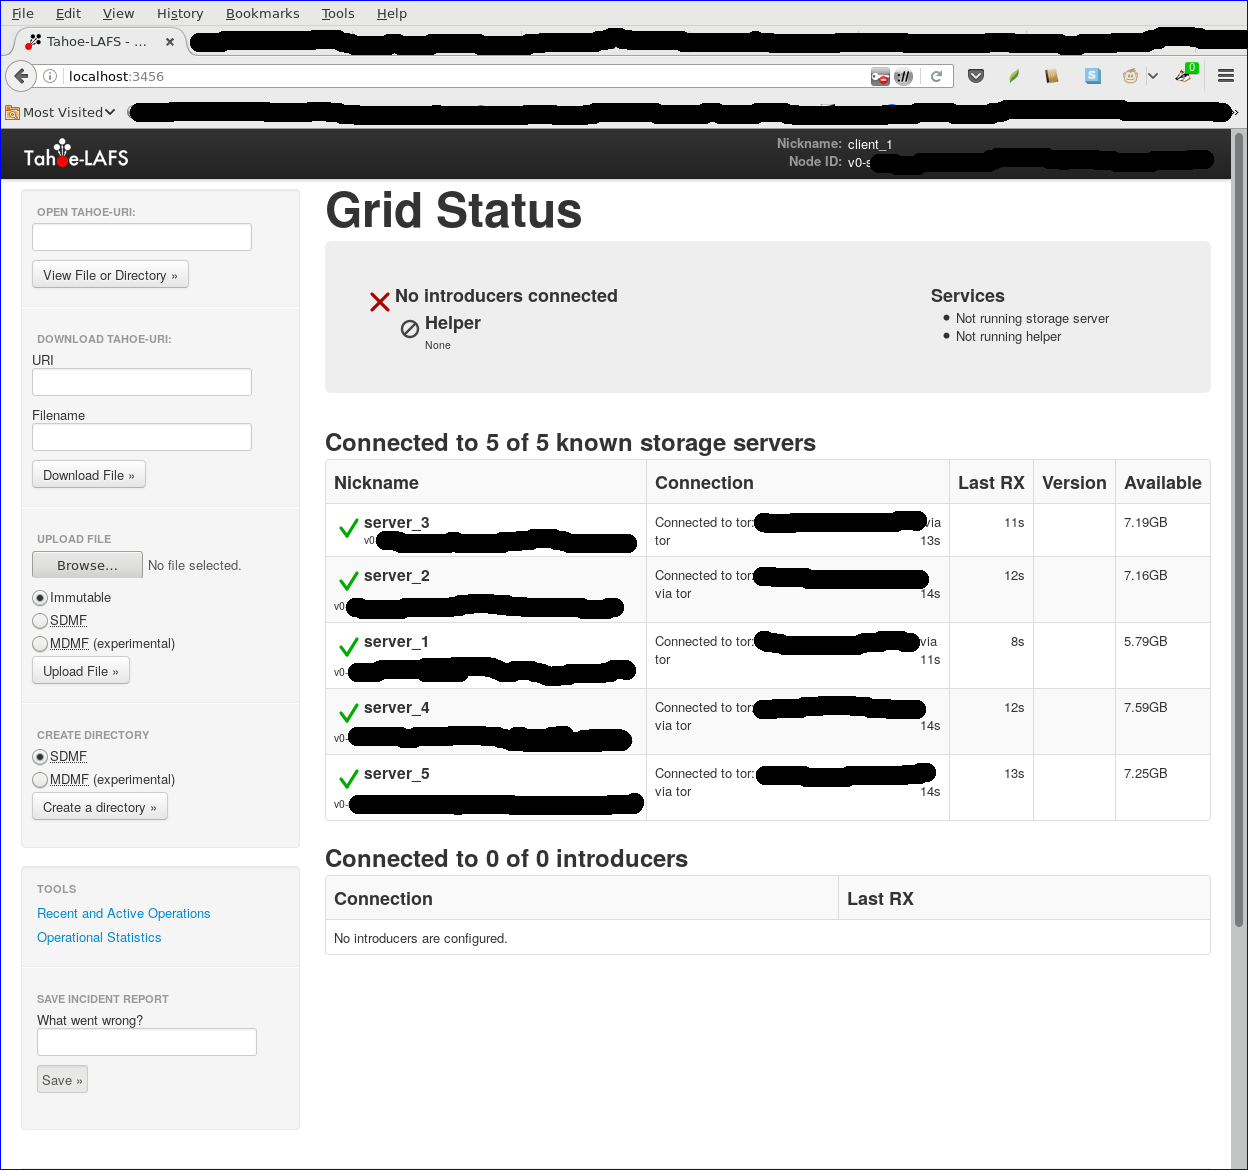
Browse to localhost:3456 and you should see your new grid connected!
Note added 1/30/2017
After I posted this note, a reader on the #tahoe-lafs channel on freenode pointed me to a pastebin by him that summarized the format for the servers.yaml file nicely. You can read his discussion here.
Herky Crypto Challenge - 2
Herky Crypto Challenge - 2
 1a213 d3eb8 a6b16 f799c 61539 f27af 529ab b1f51
 85ef1 68536 a7f6b f0e2c e1dde 44885 fd058 c86be
 dac0e c2a0e 45764 b7755 f8bcd 51d36 257e7 bc39d
 2019a 97850 77525 77e5c 8b66f a581a 4ff59 64854
 97d20 2bd44

 102b2 67aeb affe6 e7080 35118 e68ee 09c1e e1217
 d2fe5 fd563 e0bfe f0e63 b5c6f 95ad7 e4409 09bff
 c9cda 97f13 49605 87747 e2fdd d1472 6a682 9d896
 204a9 23d41 7d471 b584a d275f c5e58 2cf98 5455f
95d50 bbf44Metadata-less Encrypted Chat Using Axolotl+Tor
Metadata-less axotor
axotor is a command-line chat utility that uses the Axolotl (aka double ratchet) protocol for forward-secret, future-secret, deniable communication. All communication is carried out over the tor network, so there is absolutely no metadata to be surveilled either! Further, all hidden service parameters (keys, onion addresses, etc.) as well as the axolotl key database are stored only in ram. None of this information is ever written to disk! When you quit the chat client and shut down your computer, all of that information disappears forever. This post is an attempt to illustrate axotor's use.
Key exchange between server and client instances is extremely simple. Both both users (we'll call them bob and doug) need to securely agree on a master key via some out-of-band method. The key needs to be of the form NNN-xxxx where NNN is an integer, and xxxx is a complex alphanumeric string. For example, 93-xyz1zy would serve as a key (don't use this one). The integer and the string are separated by a hyphen.
axotor uses this master key to: 1) exchange various credentials such as the address of the server's onion, the onion's authentication cookie, and a ratchet key, and 2) to create the original Axolotl key databases. Credential exchange takes place using password-authenticated key exchange (PAKE). The python magic-wormhole module supplies PAKE functionality. The exchange of credentials takes place over the tor network as well.
There is a nice video (15MB in size) of axotor usage.
Installation is straightforward (although if you want to skip the installation steps and just try it out, go here). Axotor requires the pyaxo, pysocks, txtorcon, stem, and magic-wormhole python modules to be installed. These are available on pypi and can be installed with the command:
sudo pip install pyaxo pysocks txtorcon stem magic-wormholeaxotor.py can be found in the /usr/share/pyaxo/examples subdirectory. To link axotor and its supporting modules in the /usr/local/bin directory, execute the following commands:
sudo ln -s /usr/share/pyaxo/examples/axotor.py /usr/local/bin/axotor
sudo ln -s /usr/share/pyaxo/examples/smp.py /usr/local/bin/smp.py
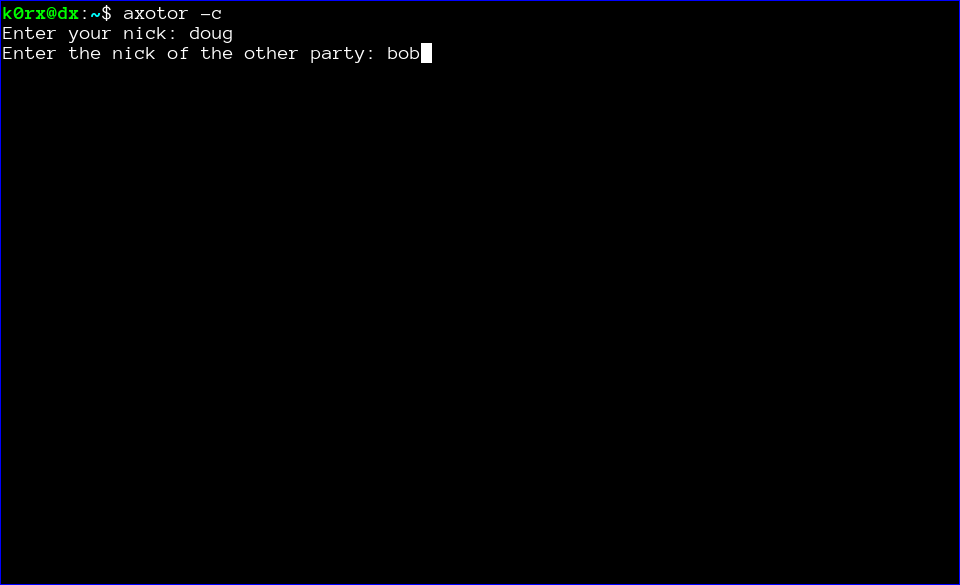
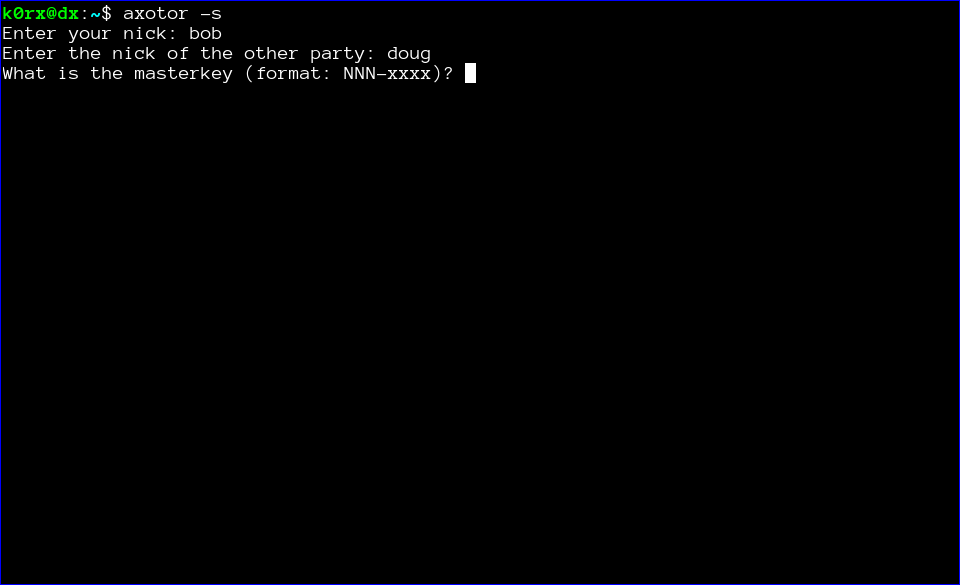
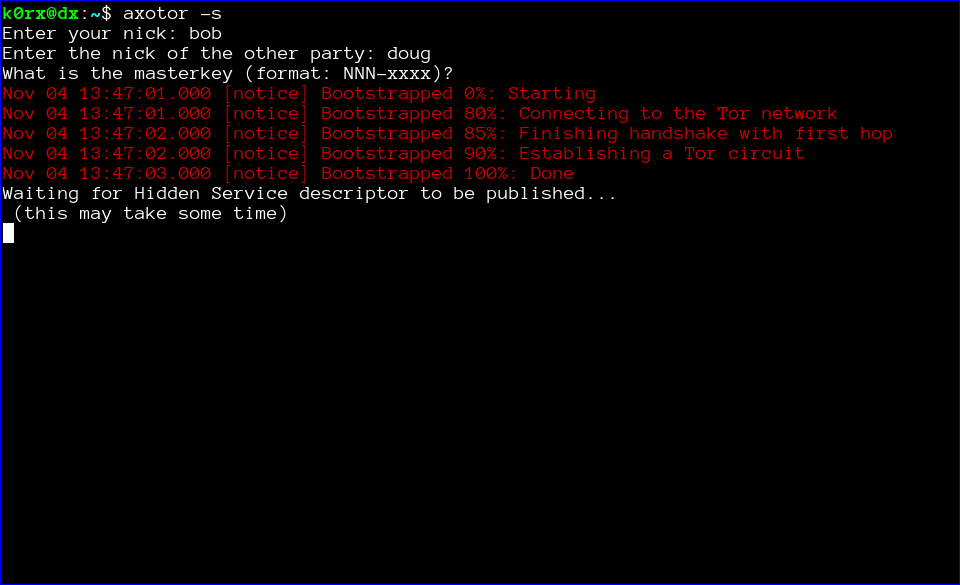
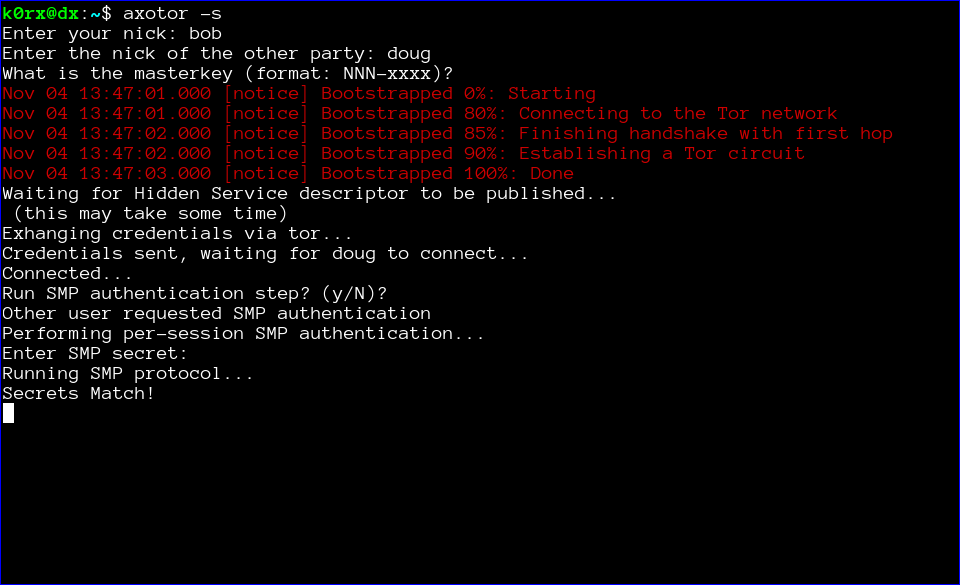
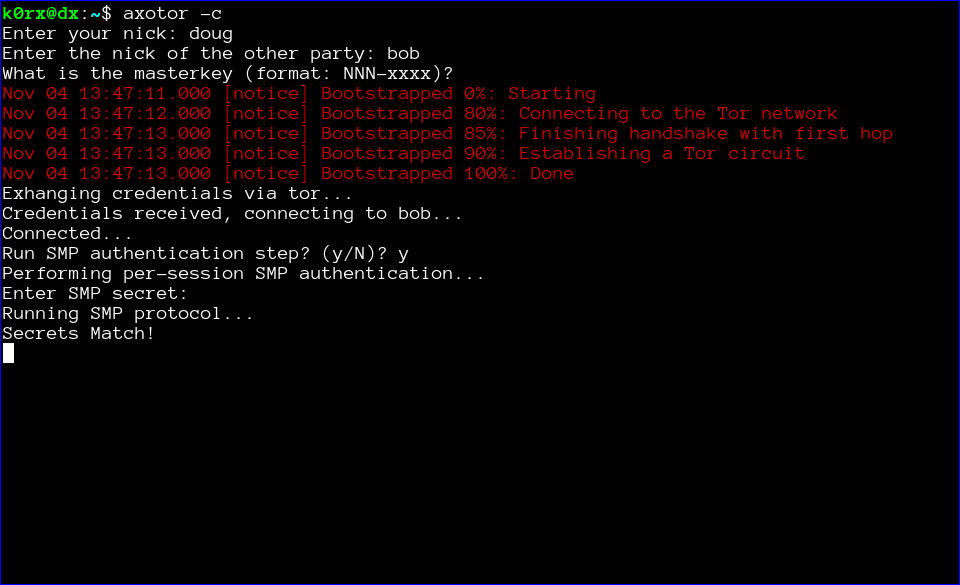
sudo ln -s /usr/share/pyaxo/examples/wh.py /usr/local/bin/wh.pyAfter you have installed axotor, usage proceeds as follows (click the thumbnails on the terminal images for a larger version of each image):
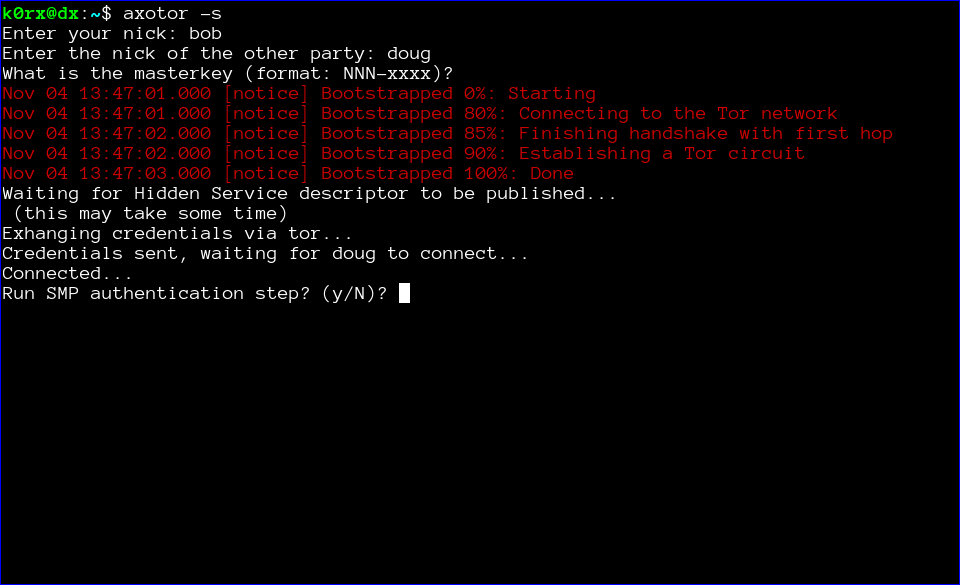
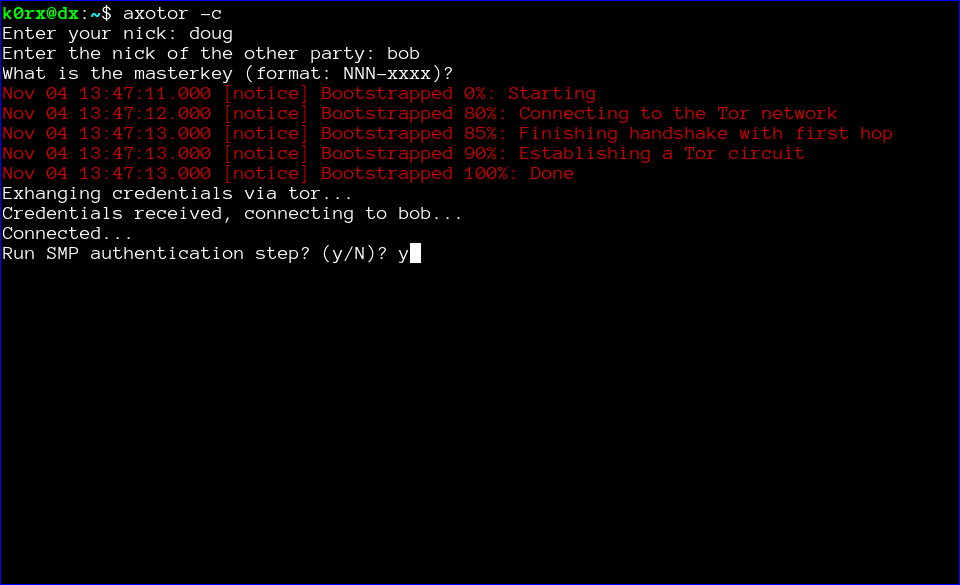
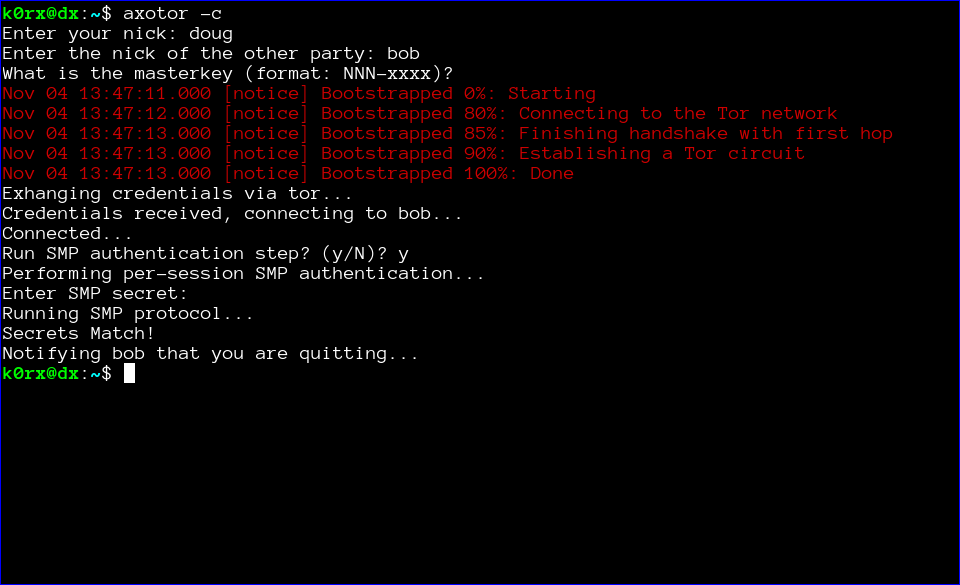
The first step is for both users to start axotor. One user starts as the server using axotor -s (left-side images) and the second user starts as the client axotor -c (right-side images).
Each user selects and enters a nickname.


Each user then enters the nickname for their communication partner.

Finally, each user enters the previously agreed-upon master key.

The server then proceeds to create a tor hidden service. axotor will wait until the hidden service descriptor is published before returning (this usually takes about 30 seconds or so).

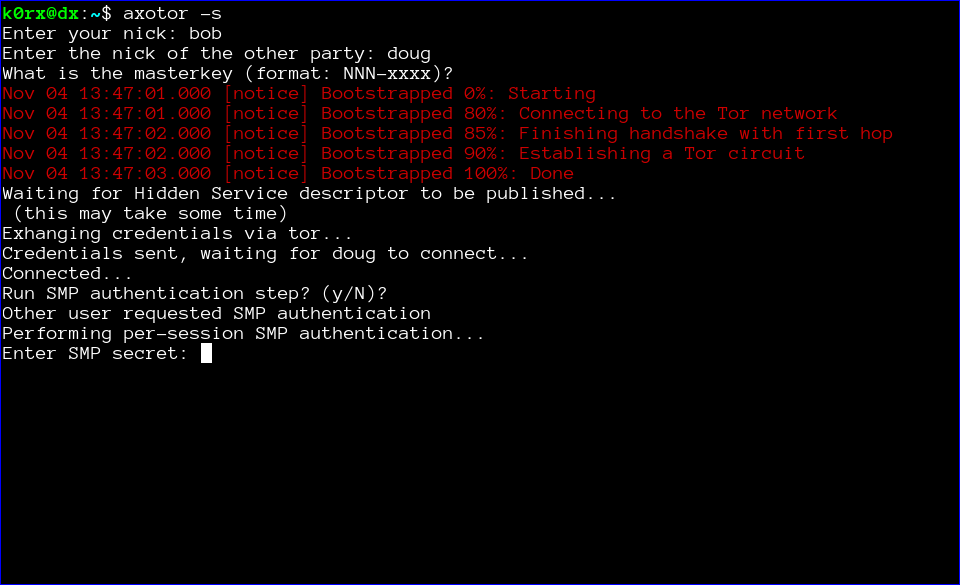
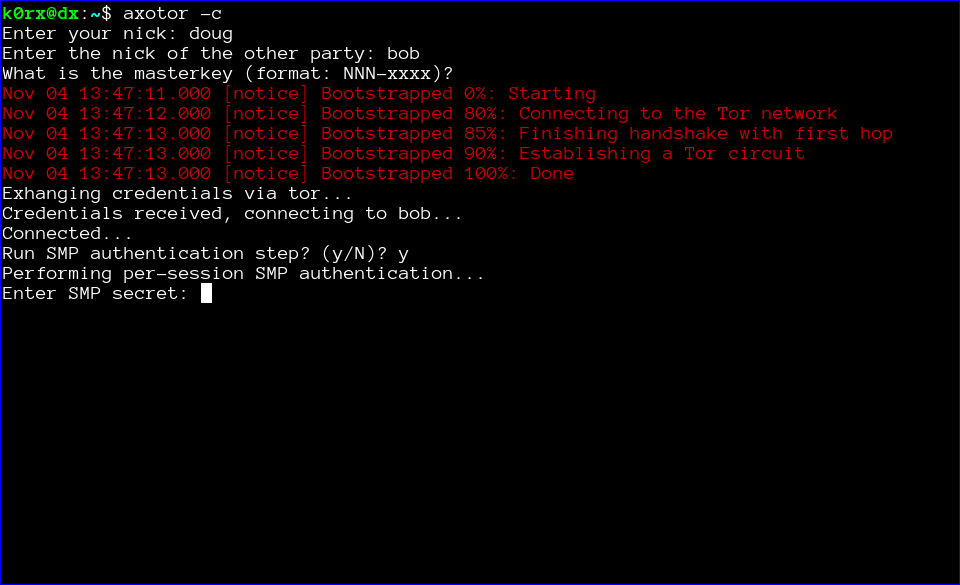
axotor will then ask if either user wants to go through a socialist millionaire's protocol authentication process. In the example below, bob chose not to, but doug wanted to. As a result, axotor will require SMP authentication. If neither user wanted to go through the SMP authentication step, axotor will skip it and go directly to the chat window. Obviously, if both users request SMP, axotor will execute the protocol as well
axotor then asks for the authentication secret. This should be an additional secret agreed to out-of-band by the two users.
axotor notifies each user of the success or failure of the SMP step.
Finally, the chat window opens. Green text signifies that either the SMP step was successful, or that the users chose to skip that step. If the the SMP step is not successful, the users will be prompted to exit. If they choose not to, the text will appear red to remind them that the SMP step was unsuccessful.


At this point, axotor acts like every other chat client. The users can exchange messages as they wish. Each message is encrypted with a different key, with what is widely recognized as the most secure messaging protocol available (Axolotl).

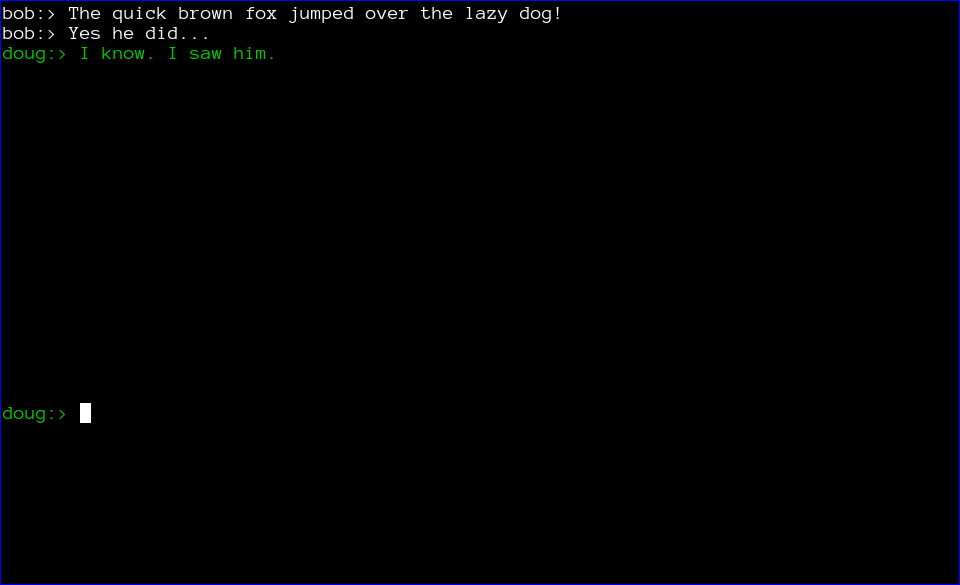
Finally, when the chat is over, either user can type .quit to exit the chat. In the case shown below, doug chose to quit.
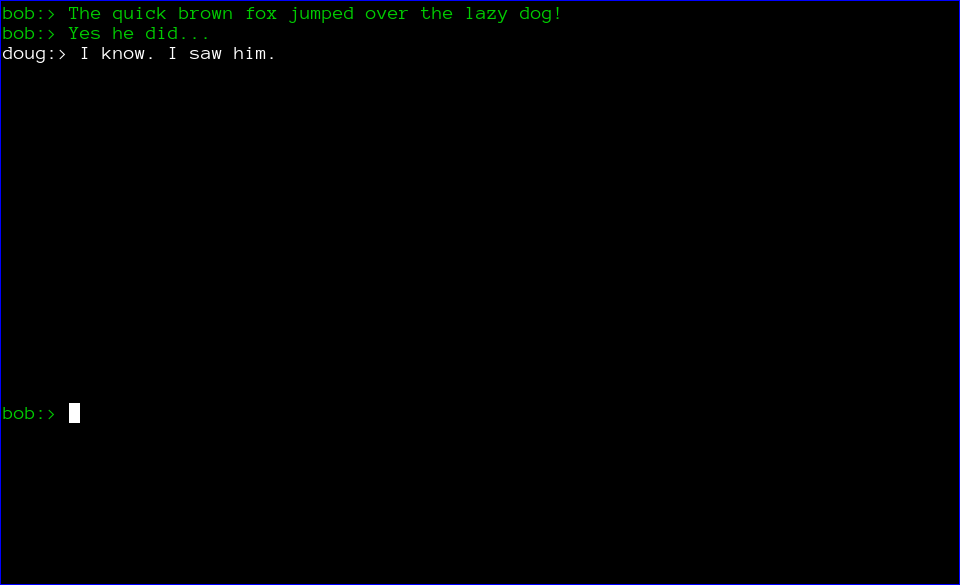
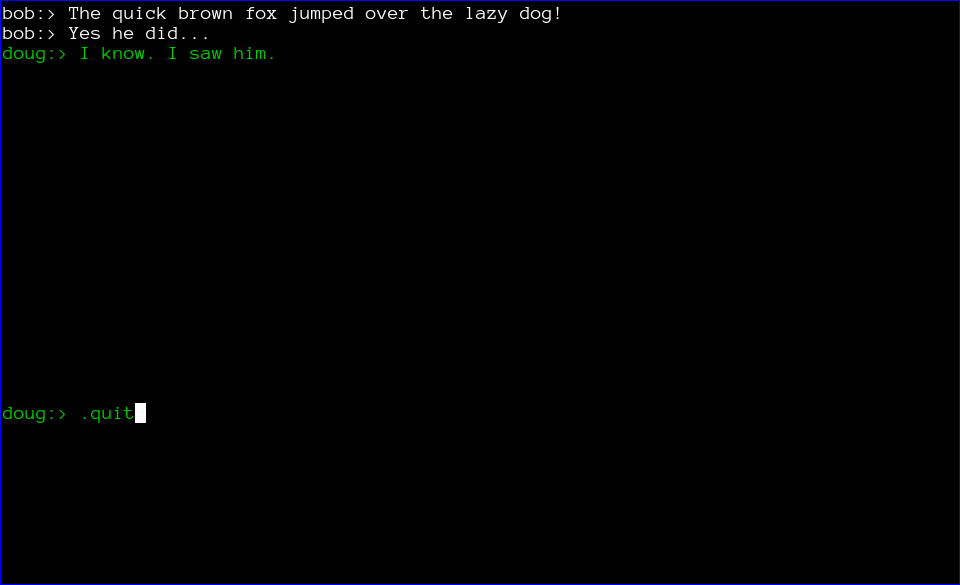
axotor then notifies bob that doug has quit the chat and shuts down the chat window.

End Notes
The axotor server and client instances use different ports for their tor servers, so it is very easy to try axotor out. You can run the server and client side by side in two different terminal windows on the same machine.
If you want to try axotor out without going through all the installation steps, there is a docker image I created to do that. Execute the start.sh script from the unmessage-client repository and this will download and run the docker image. At the docker container's bash prompt, proceed with the commands axotor -s or axotor -c as appropriate.
We also want to emphasize that the code has not been audited. Please do not use axotor for any activity that your life depends upon!
Postscript
The file-transfer branch of the pyaxo github repository has the capability for encrypted file transfer as well.
Edit: encrypted file transfer is now enabled in master branch.
Extracting OTR private keys from the Conversations Android app
I think Conversations is a great xmpp client for Android. But sometimes I want to use a desktop client, and want to use the same OTR private key for the desktop that I do in Conversations. So I wrote the following script to export private OTR keys. The extracted key is given in both raw hex and in (base64'd) libotr format, so it can be imported into virtually any xmpp client that supports OTR.
With a little cleverness, the script could be adapted to modify or add OTR keys to the Conversations database. That is left as an exercise for the reader.
There are versions of the script for both rooted and nonrooted phones. See the github repo.
The script is available at: https://github.com/rxcomm/convkey
#!/usr/bin/env python
"""Copyright 2016 by David R. Andersen <k0rx@RXcomm.net>.

This script is free software; you can redistribute it and/or modify
it under the terms of the GNU Lesser General Public License as published by
the Free Software Foundation; either version 3 of the License, or
any later version.

This script is distributed in the hope that it will be useful,
but WITHOUT ANY WARRANTY; without even the implied warranty of
MERCHANTABILITY or FITNESS FOR A PARTICULAR PURPOSE.  See the
GNU Lesser General Public License for more details.

You should have received a copy of the GNU Lesser General Public License
along with this library.  If not, see <http://www.gnu.org/licenses/>.

This script will read a Conversations database from an Android phone
and output the OTR private keys for each account in the database.

Instructions:

1. You must have adb installed on your system (apt-get adb in
   Debian/Ubuntu). The script uses adb to get the database.

2. Plug your phone in and run this script.
"""

import os
import sqlite3
import json
import binascii
#import pprint
from otrapps.util import fingerprint
from potr.compatcrypto.pycrypto import DSAKey
from subprocess import call, PIPE

def get_database():
    """Pull the Conversations database from an Android phone using adb"""

    # FIXME: do some error checking here...
    call(['adb', 'kill-server'], stdout=PIPE, stderr=PIPE)
    call(['adb', 'root'], stdout=PIPE, stderr=PIPE)
    call(['adb', 'pull',
          '/data/data/eu.siacs.conversations/databases/history',
          'history'], stdout=PIPE, stderr=PIPE)
    call(['adb', 'kill-server'], stdout=PIPE, stderr=PIPE)
    return

def parse_database():
    """Parse the Conversations database for all private OTR keys"""

    keydict = {}
    database = sqlite3.connect('history')
    os.remove('history')
    cur = database.cursor()
    cur.execute('select * from accounts')
    account_data = cur.fetchall()
    cur.close()
    for account in account_data:
        userid = account[1] + '@' + account[2]
        print 80*'-'
        print 'Your XMPP ID is: ' + userid + '\n'
        k = json.loads(account[7])
        print 'Your OTR private key parts are:'
        print 'Y: %s' % k['otr_y'].upper()
        print 'G: %s' % k['otr_g'].upper()
        print 'P: %s' % k['otr_p'].upper()
        print 'Q: %s' % k['otr_q'].upper()
        print 'X: %s' % k['otr_x'].upper()
        k['otr_y'] = int(k['otr_y'], 16)
        k['otr_g'] = int(k['otr_g'], 16)
        k['otr_p'] = int(k['otr_p'], 16)
        k['otr_q'] = int(k['otr_q'], 16)
        k['otr_x'] = int(k['otr_x'], 16)

        newkey = DSAKey((k['otr_y'],
                         k['otr_g'],
                         k['otr_p'],
                         k['otr_q'],
                         k['otr_x']
                        ),
                        private=True)
        fprint = fingerprint((k['otr_y'], k['otr_g'], k['otr_p'], k['otr_q']))
        print 'Fingerprint: ' + fprint.upper() + '\n'
        print 'Your base64-encoded OTR private key is [in libotr format]:\n%s' \
               % binascii.b2a_base64(newkey.serializePrivateKey())

        # keydict is compatible with keysync from The Guardian Project
        keydict[userid] = {'fingerprint': fprint,
                           'name': userid,
                           'protocol': 'XMPP',
                           'resource': 'Conversations',
                           'verification': None, # I'm not sure what this means
                           'p': k['otr_p'],
                           'q': k['otr_q'],
                           'g': k['otr_g'],
                           'x': k['otr_x'],
                           'y': k['otr_y'],
                          }
    #pprint.pprint(keydict)

if __name__ == '__main__':
    get_database()
parse_database()Axotor - A metadata-less Axolotl standalone chat client
A standalone, forward-secret, metadataless chat application is a useful thing in today's world. I've created one using the pyaxo Axolotl library. The axolotl protocol provides the forward secrecy, and tor eliminates the metadata.
The client is based on a client-server model, where one party to the chat establishes a server, and the other party connects to the server as a client. The interesting thing about this application is that the connection is made through tor. The server creates a hidden service, and the client connects to that hidden service, so all communication is hidden (even from the tor exit nodes).
The client is terminal-based, and uses ncurses. axotor.py can be found in the examples subdirectory of the pyaxo github repo. pyaxo is available in the python package manager and can be installed via pip. When pyaxo is installed via pip, axotor.py is located in the /usr/share/pyaxo/examples directory.
Here are a couple of images of the startup process:


Here are the resulting chat windows:


Upgrading Mixminion
I've recently spent some time playing with Mixminion for a project that a student and I are working on. Mixminion is a third-generation remailer project developed by George Danezis, Roger Dingledine, and Nick Mathewson. Their paper on the protocol for Mixminion is located here. Mixminion is the third generation after the Cypherpunk anonymous remailer, and the Mixmaster anonymous remailer (in this numbering scheme, version 0 was the penet remailer). There have also been a few other attempts along the way to provide these kind of high-latency mix networks that have either been broken, not achieved wide popularity, or not yet implemented.
Mixminion has been neglected for a long time. Development efforts essentially ceased in late 2007 or early 2008. The primary developers moved on to play key roles in the creation of that well-known and quite successful low-latency onion network, the Tor network. On the one hand, that's a good thing because Tor has certainly benefited from their stewardship. On the other hand, it has been tough going for high-latency projects such as Mixminion.
Over the years, the code has gotten a bit stale, with crypto parameters substandard with respect to what we expect now, and other code issues as well. As a result, I've taken a bit of time to upgrade Mixminion, fixing problems so that it is in a usable form again. These changes are published in my mixminion github repo.
There are basically three modifications that I have made. I summarize them here:
- Upgrade the Diffie-Hellman parameters to use a 2048-bit prime (it was 512!).
- Disable the SSLv3 protocol for inter-server connections. SSLv2 was already disabled.
- Get the directory server (mixminion dir) functionality working again.
The SSL/TLS stuff was straightforward. The only downside here is that for slow servers, or those without lots of entropy, it can take a bit of time to generate the DH parameters on initial start or on replacement of these parameters. Such is the cost of progress...
The directory server stuff was a bit more complex. However, a brief exchange with Nick Mathewson help set me straight. In essence, I rolled the directory server code back to the bf7e8642b17fc49479d00aee3f6e157bca5d3ef6 commit. This rollback included all files in lib/mixminion/directory. Luckily for me, it Just Worked. An important point to make here is that this directory server represents a single point of failure for the network. So the work started by Nick to create a decentralized directory server structure is not complete by any means, but it functions well enough for the project I have in mind.
Setting up the Mixminion directory server
The directory server strings are hard-coded into the source. To run your own directory server, you need to edit appropriate lines in the following files to point to your own directory server:
 lib/mixminion/ClientDirectory.py (points to the Directory.gz download link)
 lib/mixminion/server/ServerKeys.py (points to the link with the CGI script listed below)
 lib/mixminion/directory/DirCGI.py (the DIRECTORY_BASE variable points to the same place as Homedir below)
The ClientDirectory.py file also contains the fingerprint of your directory server, which you can find by executing the mixminion dir fingerprint command on the node running the directory server.
You also need to place the directory server configuration file .mixminion_dir.cf at the root of the user running mixminiond. My version of the file looks like this:
 [Directory-Store]
 Homedir = /home/mixminion/MixminonDirectory
 DirUser = mixminion
 CGIUser = www-data
 CGIGroup = www-data

 [Directory]
 ClientVersions = 0.0.7 0.0.8alpha3
 ServerVersions = 0.0.7 0.0.8alpha3

 [Publishing]
 Location = /var/www/mixminion/Directory.gz
Homedir points to the base directory for the directory server files (create the required directory structure with mixminion dir initialize. DirUser, CGIUser, and CGIGroup are the user running mixminiond, and the CGI user and group respectively. ClientVersions and ServerVersions are strings to highlight recommended mixminion versions. Finally, Location is the location where your published Directory.gz file will be served from.
Nick also gave me this simple CGI script to run when the publish URL is queried.
 #!/usr/bin/python

 import sys
 sys.path[0:0] = ['/usr/local/lib/python2.7/dist-packages']

 import mixminion.directory.DirCGI
 mixminion.directory.DirCGI.run()
This script will copy the ServerDesc file to the appropriate location in the directory server for further processing.
Useful commands for interacting with the mixminion directory server are found using the mixminion dir command.
Enjoy!
nymphemeral - the latest release is fantastic!
Felipe's been working very hard and the latest release (1.3.2) is fantastic!
To wit: an ephemeral nymserv client based on the Zax-style nymserv. The client also incorporates end-to-end encryption and signatures using GPG if desired. Here's a link to some documentation.
To install, sudo pip install nymphemeral should do it. To upgrade, sudo pip install nymphemeral --upgrade. Source code for nymphemeral is also available.
nymphemeral - a GUI client for use with forward-secret nymservs
nymphemeral is a GUI client written in python for use with Zax-style forward-secret nymservs. A nymserv is a server that permits sending and receiving anonymous email through the mixmaster network.
nymphemeral can be easily installed via pip. Instructions are located here. It can also be installed by cloning the git repo and the usual sudo python setup.py install mechanism.
Currently, the only forward-secret nymserv in the wild is at nym.now.im. If you would like to deploy your own, source code for the nymserv is also on github. When you add one, please leave a comment here so people will become aware of its existance.