A secure, hidden tahoe-lafs grid
This note documents how to deploy a secure, hidden tahoe-lafs grid over the tor network. The storage servers are hard-coded so no introducer is required. All storage servers are accessed only through their onion address, and the onion addresses are protected using stealth access mode. Thus, a cookie for each storage server in the grid is included in the client's torrc file.
The possibility of doing this was first discussed in the comments following a posting on the tor blog. Below I summarize the steps required to actually implement the secure, hidden tahoe-lafs grid.
In what follows, we will assume that the storage server configuration directory is located at ~/.tahoe-server and the client configuration directory is located at ~/.tahoe. Modify the instructions below according to your installation. The easiest way to create these configuration directories is to use the create-node (for the servers) and create-client commands. On each server node, run tahoe create-node --hostname=fixme .tahoe-server. This will generate a skeleton configuration for the server. Similarly, the command tahoe create-client .tahoe wil create a skeleton client configuration. You will modify these configurations as described below.
Storage server configuration
For each storage server, the first step is to create a tor hidden service that points to the local tub.port. Include the following lines in the storage server's /etc/tor/torrc file (modify the HiddenServiceDir and HiddenServicePort parameters as appropriate for your installation):
HiddenServiceDir /var/lib/tor/tahoe-server/
HiddenServiceAuthorizeClient stealth server_1
HiddenServicePort 3457 127.0.0.1:3457
and restart the storage server's tor daemon.
To determine the onion address for the storage server, cat /var/lib/tor/tahoe-server/hostname. The output of this command will look something like:
adfmcm3mkfkx8fds.onion fdjkhasz734mxhuaiTUjfs # client: server_1The first string in this line is the hidden service onion address, and the second string is the stealth cookie. The comment following the # symbol is just to remind you which storage server these credentials correspond to.
Repeat this process on each storage server node. You will get a unique onion address and stealth cookie for each storage server. Save these for later
The ~/.tahoe-server/tahoe.cfg file for each server node looks like this:
# -*- mode: conf; coding: utf-8 -*-

# This file controls the configuration of the Tahoe node that
# lives in this directory. It is only read at node startup.
# For details about the keys that can be set here, please
# read the 'docs/configuration.rst' file that came with your
# Tahoe installation.


[node]
nickname = node_l
reveal-IP-address = false
web.port =
web.static = public_html
tub.port = tcp:3457:interface=127.0.0.1
tub.location = tor:adfmcm3mkfkx8fds.onion:3457

[client]
# Which services should this client connect to?
introducer.furl =
helper.furl =
#stats_gatherer.furl =

# Encoding parameters this client will use for newly-uploaded files
# This can be changed at any time: the encoding is saved in
# each filecap, and we can download old files with any encoding
# settings
shares.needed = 3
shares.happy = 7
shares.total = 10

[storage]
# Shall this node provide storage service?
enabled = true
#readonly =
reserved_space = 1G
expire.enabled = true
expire.mode = age
expire.override_lease_duration = 3 months

[helper]
# Shall this node run a helper service that clients can use?
enabled = false

[connections]
tcp = tor
The onion address set in tub.location must match the onion address you obtained for that storage server node. The port must also match that set in the HiddenServicePort parameter. Adjust parameters such as nickname, lease expiration, and reserved_space as appropriate for your installation.
Start each storage server with tahoe start ~/.tahoe-server, modifying the server directory as appropriate. The storage grid setup is now complete and all of your storage servers should be running.
Client configuration
The first step is to configure the client's tor daemon so that it can find and access the storage server onions. Add the following lines to the bottom of /etc/tor/torrc on the client node (one line for each storage server):
HidServAuth adfmcm3mkfkx8fds.onion fdjkhasz734mxhuaiTUjfs # client: server_1
HidServAuth zxlkj33klsjfu3nf.onion lajdf8z33nmnnxuiufjlds # client: server_2
...
The strings following the HidServAuth parameter should match those you saved for later in the server configuration instructions above. Restart the tor daemon.
The next step is to create the ~/.tahoe/private/servers.yaml file. This file contains hardcoded information on how the client will connect to the storage servers. In order to enhance the privacy and anonymity of the grid, no introducer or helper nodes are used. The formatting of the servers.yaml file is critical. Be sure to follow the formatting exactly as shown here (two spaces per indentation).
storage:
  v0-lkzjkleloafjko3kfldskojfiiui34ljkkljfadkljfdjkljfakl:
    ann:
      nickname: server_1
      anonymous-storage-FURL: pb://hxmipb3sfebovhev2mwbumtcn276ph6z@tor:adfmcm3mkfkx8fds.onion:3457/7pqmhbq2s2m4ms72zaz23jixd64wt34h
# storage
  v0-lj3lmziojprmklzxpoguik33jkfl889lzjfskljfkslfjkdslffd:
    ann:
      nickname: server_2
      anonymous-storage-FURL: pb://syw73rxtygpomuhtsqzqdhhtoopwo7gp@tor:zxlkj33klsjfu3nf.onion:3457/c4iahx6xbpzrxrn5rjnc4rie23gcglk3
# storage
...
The strings beginning with v0- are the public keys of each of the storage servers. These are in ~/.tahoe-server/node.pubkey. Be sure to just include the part of the key beginning v0- in the servers.yaml file. Replace each storage server public key in servers.yaml with your storage server's public key.
The anonymous-storage-FURL's beginning with pb:// should be replaced with the FURL's from your actual storage servers. The FURL for each storage server can be found at ~/.tahoe-server/private/storage.furl. Apparently, the # storage comment lines between each storage server's information are required, so be sure to include these.
The client's ~/.tahoe/tahoe.cfg file should look like this:
[node]
nickname = client_1
reveal-ip-address = false
web.port = tcp:3456:interface=127.0.0.1
web.static = public_html
tub.port = disabled
tub.location = disabled

[client]
introducer.furl =
#helper.furl =
shares.needed = 3
shares.happy = 7
shares.total = 10

[storage]
enabled = false
reserved_space = 1G

[helper]
enabled = false

[connections]
tcp = tor
Edit the client nickname parameter as appropriate, as well as the web.port and shares.* parameters.
Finally, start the client with tahoe start ~/.tahoe.
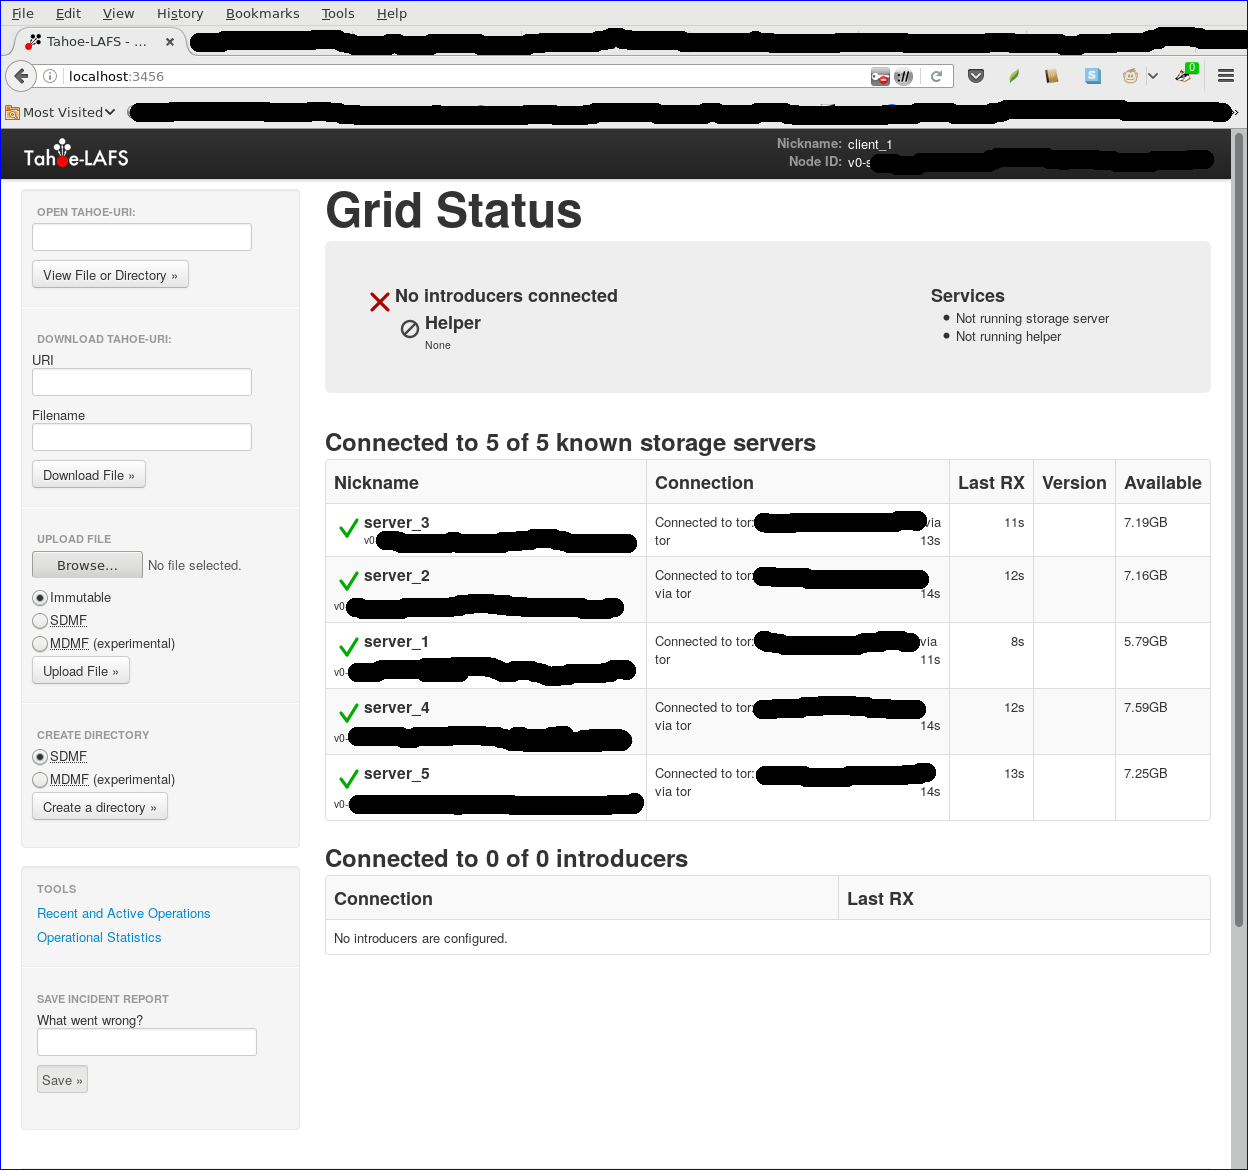
Browse to localhost:3456 and you should see your new grid connected!
Note added 1/30/2017
After I posted this note, a reader on the #tahoe-lafs channel on freenode pointed me to a pastebin by him that summarized the format for the servers.yaml file nicely. You can read his discussion here.
Metadata-less Encrypted Chat Using Axolotl+Tor
Metadata-less axotor
axotor is a command-line chat utility that uses the Axolotl (aka double ratchet) protocol for forward-secret, future-secret, deniable communication. All communication is carried out over the tor network, so there is absolutely no metadata to be surveilled either! Further, all hidden service parameters (keys, onion addresses, etc.) as well as the axolotl key database are stored only in ram. None of this information is ever written to disk! When you quit the chat client and shut down your computer, all of that information disappears forever. This post is an attempt to illustrate axotor's use.
Key exchange between server and client instances is extremely simple. Both both users (we'll call them bob and doug) need to securely agree on a master key via some out-of-band method. The key needs to be of the form NNN-xxxx where NNN is an integer, and xxxx is a complex alphanumeric string. For example, 93-xyz1zy would serve as a key (don't use this one). The integer and the string are separated by a hyphen.
axotor uses this master key to: 1) exchange various credentials such as the address of the server's onion, the onion's authentication cookie, and a ratchet key, and 2) to create the original Axolotl key databases. Credential exchange takes place using password-authenticated key exchange (PAKE). The python magic-wormhole module supplies PAKE functionality. The exchange of credentials takes place over the tor network as well.
There is a nice video (15MB in size) of axotor usage.
Installation is straightforward (although if you want to skip the installation steps and just try it out, go here). Axotor requires the pyaxo, pysocks, txtorcon, stem, and magic-wormhole python modules to be installed. These are available on pypi and can be installed with the command:
sudo pip install pyaxo pysocks txtorcon stem magic-wormholeaxotor.py can be found in the /usr/share/pyaxo/examples subdirectory. To link axotor and its supporting modules in the /usr/local/bin directory, execute the following commands:
 sudo ln -s /usr/share/pyaxo/examples/axotor.py /usr/local/bin/axotor
 sudo ln -s /usr/share/pyaxo/examples/smp.py /usr/local/bin/smp.py
 sudo ln -s /usr/share/pyaxo/examples/wh.py /usr/local/bin/wh.py
After you have installed axotor, usage proceeds as follows (click the thumbnails on the terminal images for a larger version of each image):
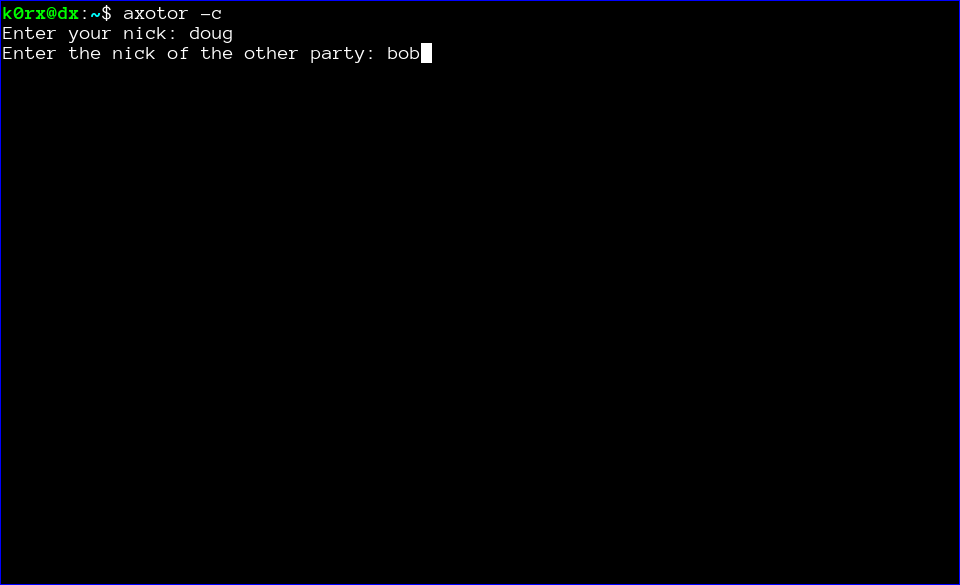
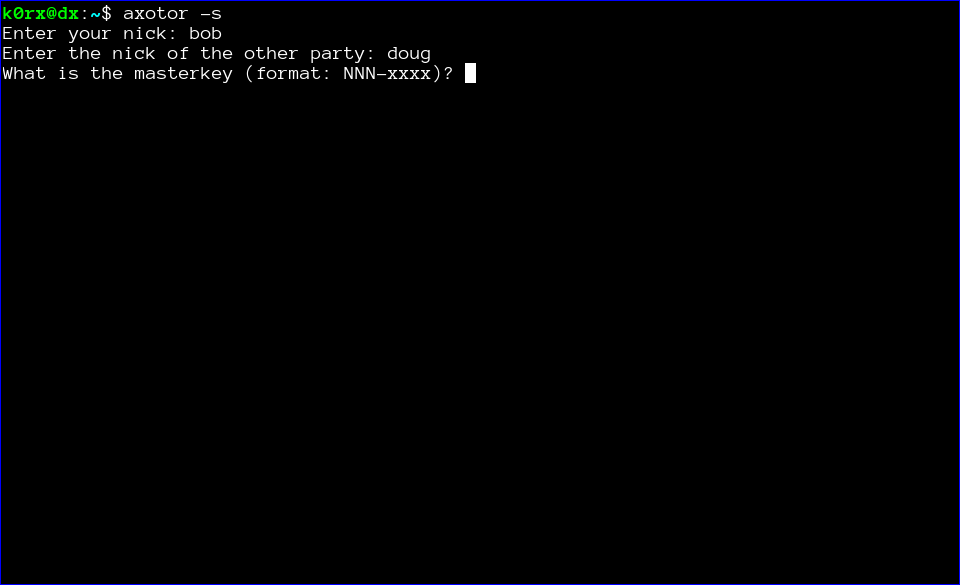
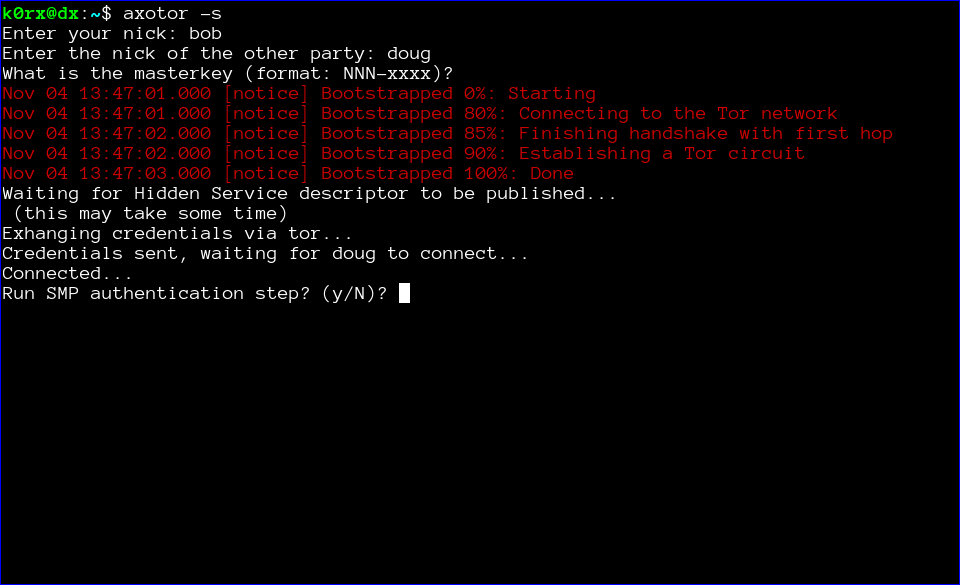
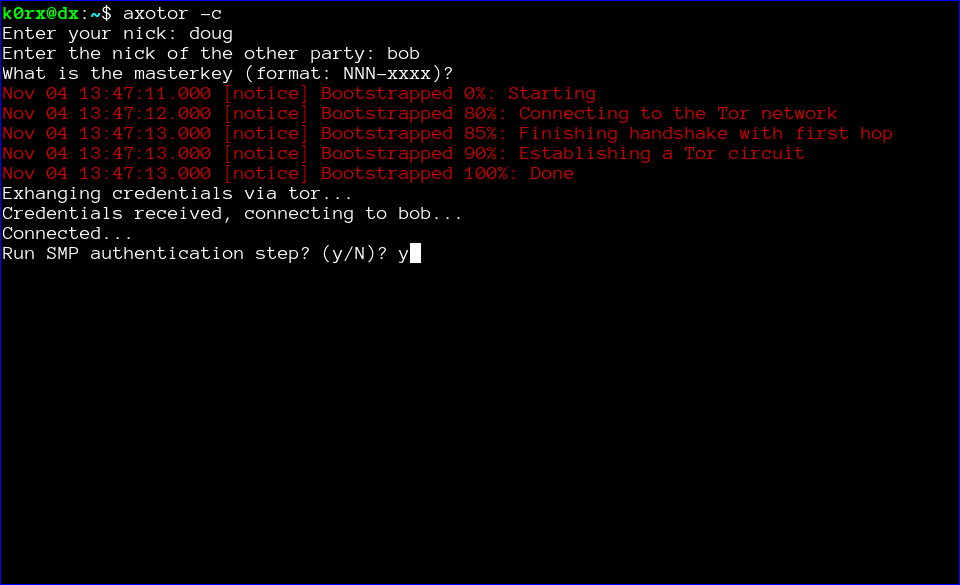
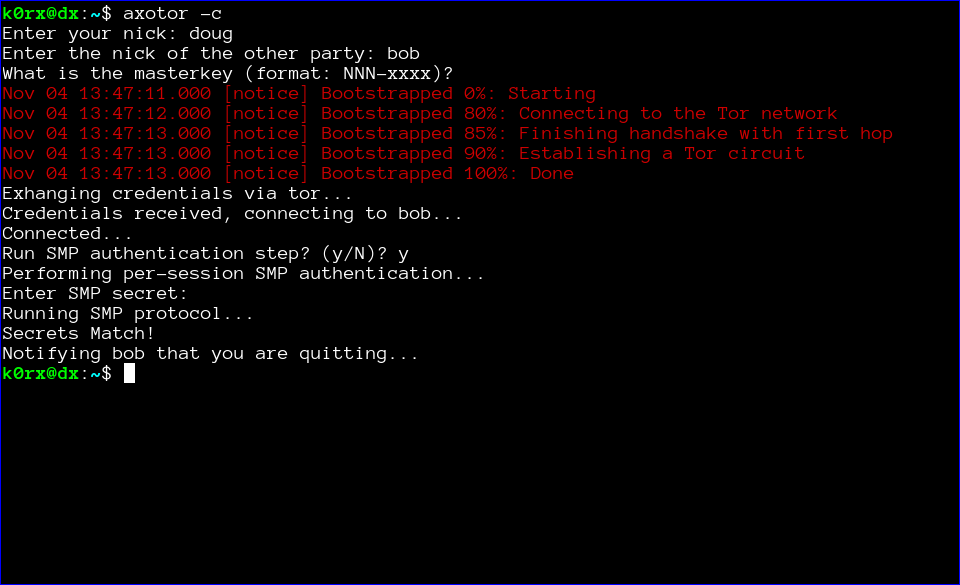
The first step is for both users to start axotor. One user starts as the server using axotor -s (left-side images) and the second user starts as the client axotor -c (right-side images).
Each user selects and enters a nickname.


Each user then enters the nickname for their communication partner.

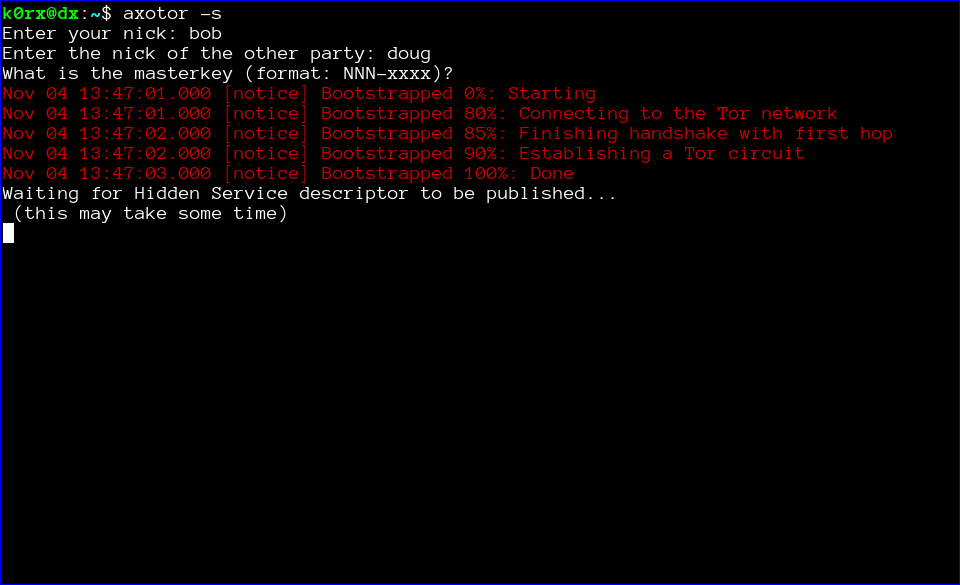
Finally, each user enters the previously agreed-upon master key.

The server then proceeds to create a tor hidden service. axotor will wait until the hidden service descriptor is published before returning (this usually takes about 30 seconds or so).

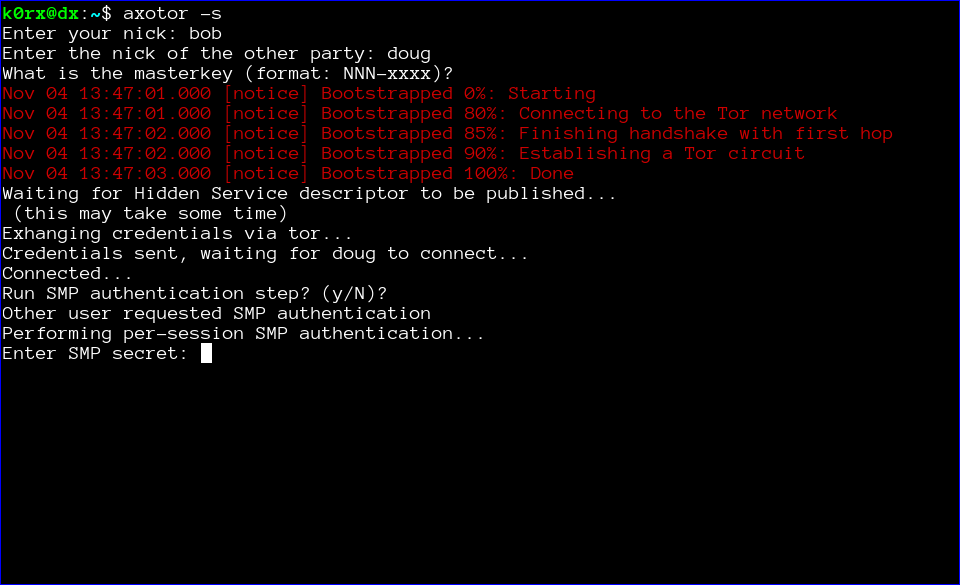
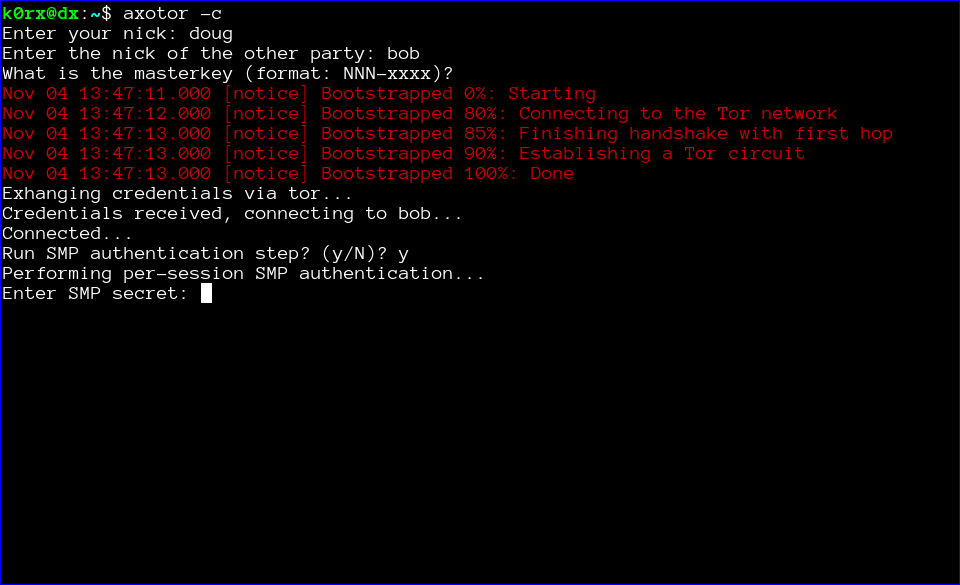
axotor will then ask if either user wants to go through a socialist millionaire's protocol authentication process. In the example below, bob chose not to, but doug wanted to. As a result, axotor will require SMP authentication. If neither user wanted to go through the SMP authentication step, axotor will skip it and go directly to the chat window. Obviously, if both users request SMP, axotor will execute the protocol as well
axotor then asks for the authentication secret. This should be an additional secret agreed to out-of-band by the two users.
axotor notifies each user of the success or failure of the SMP step.
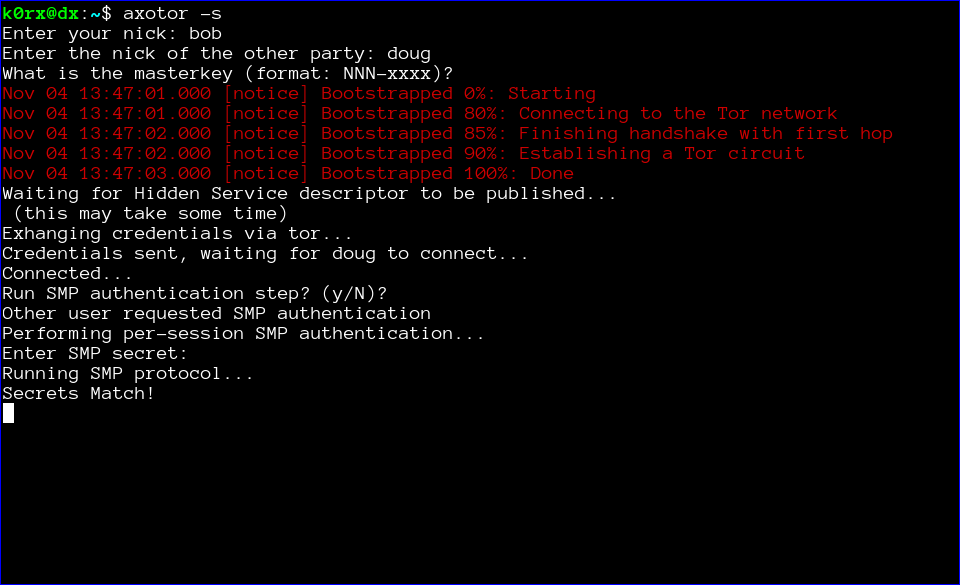
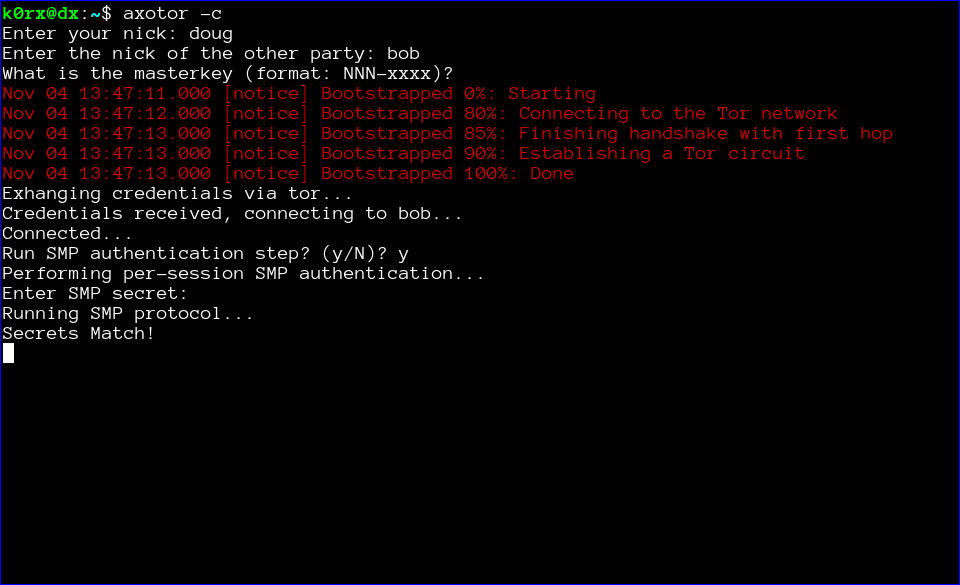
Finally, the chat window opens. Green text signifies that either the SMP step was successful, or that the users chose to skip that step. If the the SMP step is not successful, the users will be prompted to exit. If they choose not to, the text will appear red to remind them that the SMP step was unsuccessful.


At this point, axotor acts like every other chat client. The users can exchange messages as they wish. Each message is encrypted with a different key, with what is widely recognized as the most secure messaging protocol available (Axolotl).

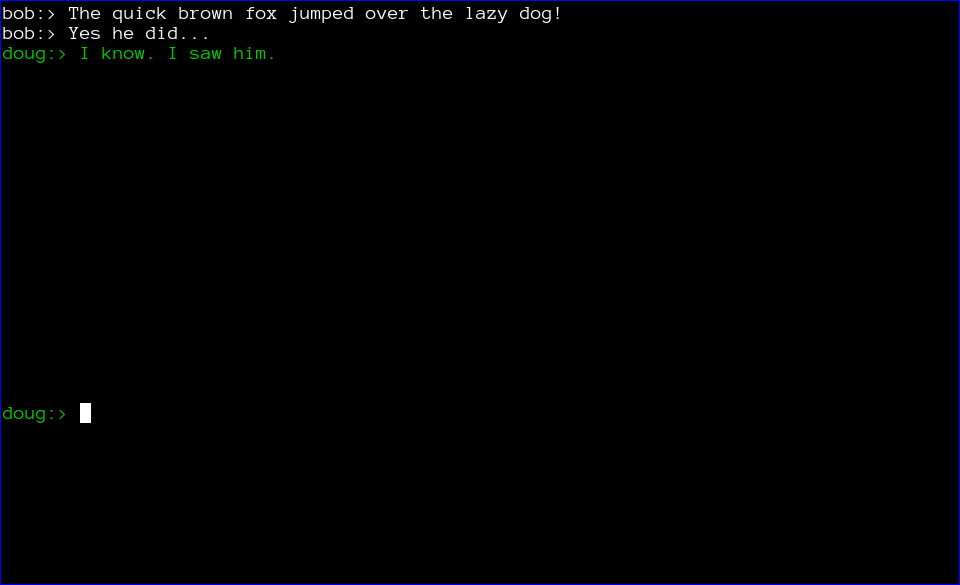
Finally, when the chat is over, either user can type .quit to exit the chat. In the case shown below, doug chose to quit.
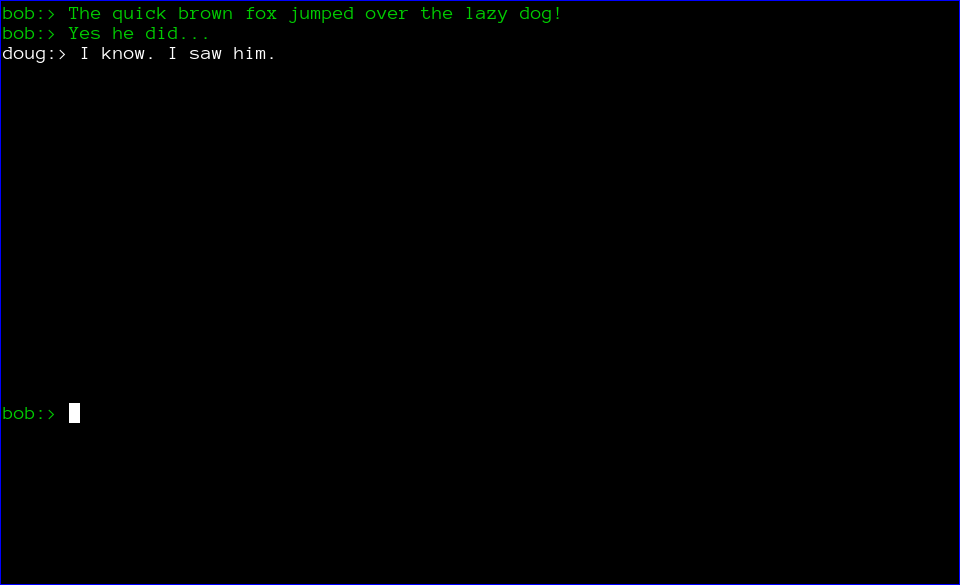
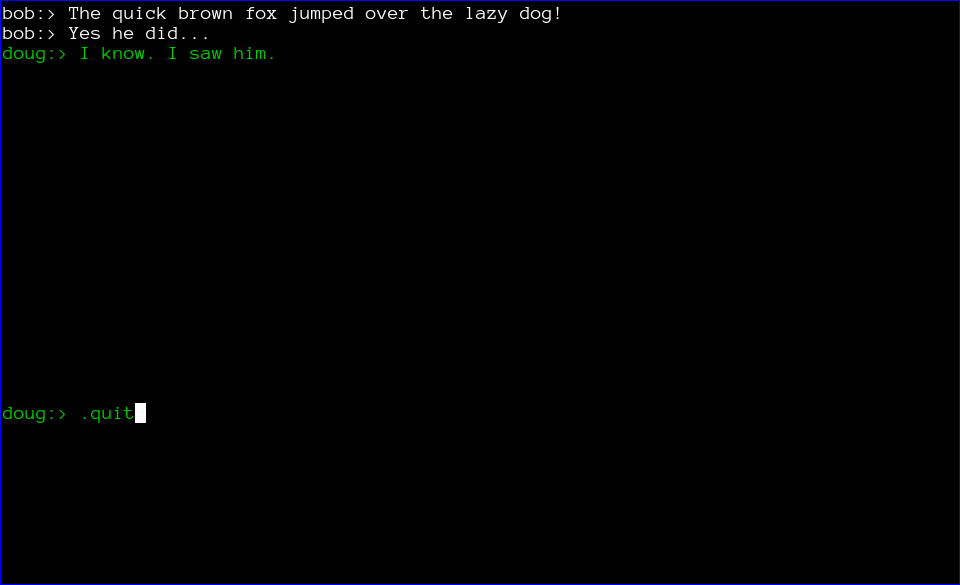
axotor then notifies bob that doug has quit the chat and shuts down the chat window.

End Notes
The axotor server and client instances use different ports for their tor servers, so it is very easy to try axotor out. You can run the server and client side by side in two different terminal windows on the same machine.
If you want to try axotor out without going through all the installation steps, there is a docker image I created to do that. Execute the start.sh script from the unmessage-client repository and this will download and run the docker image. At the docker container's bash prompt, proceed with the commands axotor -s or axotor -c as appropriate.
We also want to emphasize that the code has not been audited. Please do not use axotor for any activity that your life depends upon!
Postscript
The file-transfer branch of the pyaxo github repository has the capability for encrypted file transfer as well.
Edit: encrypted file transfer is now enabled in master branch.
Axotor - A metadata-less Axolotl standalone chat client
A standalone, forward-secret, metadataless chat application is a useful thing in today's world. I've created one using the pyaxo Axolotl library. The axolotl protocol provides the forward secrecy, and tor eliminates the metadata.
The client is based on a client-server model, where one party to the chat establishes a server, and the other party connects to the server as a client. The interesting thing about this application is that the connection is made through tor. The server creates a hidden service, and the client connects to that hidden service, so all communication is hidden (even from the tor exit nodes).
The client is terminal-based, and uses ncurses. axotor.py can be found in the examples subdirectory of the pyaxo github repo. pyaxo is available in the python package manager and can be installed via pip. When pyaxo is installed via pip, axotor.py is located in the /usr/share/pyaxo/examples directory.
Here are a couple of images of the startup process:


Here are the resulting chat windows:

