A secure, hidden tahoe-lafs grid
This note documents how to deploy a secure, hidden tahoe-lafs grid over the tor network. The storage servers are hard-coded so no introducer is required. All storage servers are accessed only through their onion address, and the onion addresses are protected using stealth access mode. Thus, a cookie for each storage server in the grid is included in the client's torrc file.
The possibility of doing this was first discussed in the comments following a posting on the tor blog. Below I summarize the steps required to actually implement the secure, hidden tahoe-lafs grid.
In what follows, we will assume that the storage server configuration directory is located at ~/.tahoe-server and the client configuration directory is located at ~/.tahoe. Modify the instructions below according to your installation. The easiest way to create these configuration directories is to use the create-node (for the servers) and create-client commands. On each server node, run tahoe create-node --hostname=fixme .tahoe-server. This will generate a skeleton configuration for the server. Similarly, the command tahoe create-client .tahoe wil create a skeleton client configuration. You will modify these configurations as described below.
Storage server configuration
For each storage server, the first step is to create a tor hidden service that points to the local tub.port. Include the following lines in the storage server's /etc/tor/torrc file (modify the HiddenServiceDir and HiddenServicePort parameters as appropriate for your installation):
HiddenServiceDir /var/lib/tor/tahoe-server/
HiddenServiceAuthorizeClient stealth server_1
HiddenServicePort 3457 127.0.0.1:3457
and restart the storage server's tor daemon.
To determine the onion address for the storage server, cat /var/lib/tor/tahoe-server/hostname. The output of this command will look something like:
adfmcm3mkfkx8fds.onion fdjkhasz734mxhuaiTUjfs # client: server_1The first string in this line is the hidden service onion address, and the second string is the stealth cookie. The comment following the # symbol is just to remind you which storage server these credentials correspond to.
Repeat this process on each storage server node. You will get a unique onion address and stealth cookie for each storage server. Save these for later
The ~/.tahoe-server/tahoe.cfg file for each server node looks like this:
# -*- mode: conf; coding: utf-8 -*-

# This file controls the configuration of the Tahoe node that
# lives in this directory. It is only read at node startup.
# For details about the keys that can be set here, please
# read the 'docs/configuration.rst' file that came with your
# Tahoe installation.


[node]
nickname = node_l
reveal-IP-address = false
web.port =
web.static = public_html
tub.port = tcp:3457:interface=127.0.0.1
tub.location = tor:adfmcm3mkfkx8fds.onion:3457

[client]
# Which services should this client connect to?
introducer.furl =
helper.furl =
#stats_gatherer.furl =

# Encoding parameters this client will use for newly-uploaded files
# This can be changed at any time: the encoding is saved in
# each filecap, and we can download old files with any encoding
# settings
shares.needed = 3
shares.happy = 7
shares.total = 10

[storage]
# Shall this node provide storage service?
enabled = true
#readonly =
reserved_space = 1G
expire.enabled = true
expire.mode = age
expire.override_lease_duration = 3 months

[helper]
# Shall this node run a helper service that clients can use?
enabled = false

[connections]
tcp = tor
The onion address set in tub.location must match the onion address you obtained for that storage server node. The port must also match that set in the HiddenServicePort parameter. Adjust parameters such as nickname, lease expiration, and reserved_space as appropriate for your installation.
Start each storage server with tahoe start ~/.tahoe-server, modifying the server directory as appropriate. The storage grid setup is now complete and all of your storage servers should be running.
Client configuration
The first step is to configure the client's tor daemon so that it can find and access the storage server onions. Add the following lines to the bottom of /etc/tor/torrc on the client node (one line for each storage server):
HidServAuth adfmcm3mkfkx8fds.onion fdjkhasz734mxhuaiTUjfs # client: server_1
HidServAuth zxlkj33klsjfu3nf.onion lajdf8z33nmnnxuiufjlds # client: server_2
...
The strings following the HidServAuth parameter should match those you saved for later in the server configuration instructions above. Restart the tor daemon.
The next step is to create the ~/.tahoe/private/servers.yaml file. This file contains hardcoded information on how the client will connect to the storage servers. In order to enhance the privacy and anonymity of the grid, no introducer or helper nodes are used. The formatting of the servers.yaml file is critical. Be sure to follow the formatting exactly as shown here (two spaces per indentation).
storage:
  v0-lkzjkleloafjko3kfldskojfiiui34ljkkljfadkljfdjkljfakl:
    ann:
      nickname: server_1
      anonymous-storage-FURL: pb://hxmipb3sfebovhev2mwbumtcn276ph6z@tor:adfmcm3mkfkx8fds.onion:3457/7pqmhbq2s2m4ms72zaz23jixd64wt34h
# storage
  v0-lj3lmziojprmklzxpoguik33jkfl889lzjfskljfkslfjkdslffd:
    ann:
      nickname: server_2
      anonymous-storage-FURL: pb://syw73rxtygpomuhtsqzqdhhtoopwo7gp@tor:zxlkj33klsjfu3nf.onion:3457/c4iahx6xbpzrxrn5rjnc4rie23gcglk3
# storage
...
The strings beginning with v0- are the public keys of each of the storage servers. These are in ~/.tahoe-server/node.pubkey. Be sure to just include the part of the key beginning v0- in the servers.yaml file. Replace each storage server public key in servers.yaml with your storage server's public key.
The anonymous-storage-FURL's beginning with pb:// should be replaced with the FURL's from your actual storage servers. The FURL for each storage server can be found at ~/.tahoe-server/private/storage.furl. Apparently, the # storage comment lines between each storage server's information are required, so be sure to include these.
The client's ~/.tahoe/tahoe.cfg file should look like this:
[node]
nickname = client_1
reveal-ip-address = false
web.port = tcp:3456:interface=127.0.0.1
web.static = public_html
tub.port = disabled
tub.location = disabled

[client]
introducer.furl =
#helper.furl =
shares.needed = 3
shares.happy = 7
shares.total = 10

[storage]
enabled = false
reserved_space = 1G

[helper]
enabled = false

[connections]
tcp = tor
Edit the client nickname parameter as appropriate, as well as the web.port and shares.* parameters.
Finally, start the client with tahoe start ~/.tahoe.
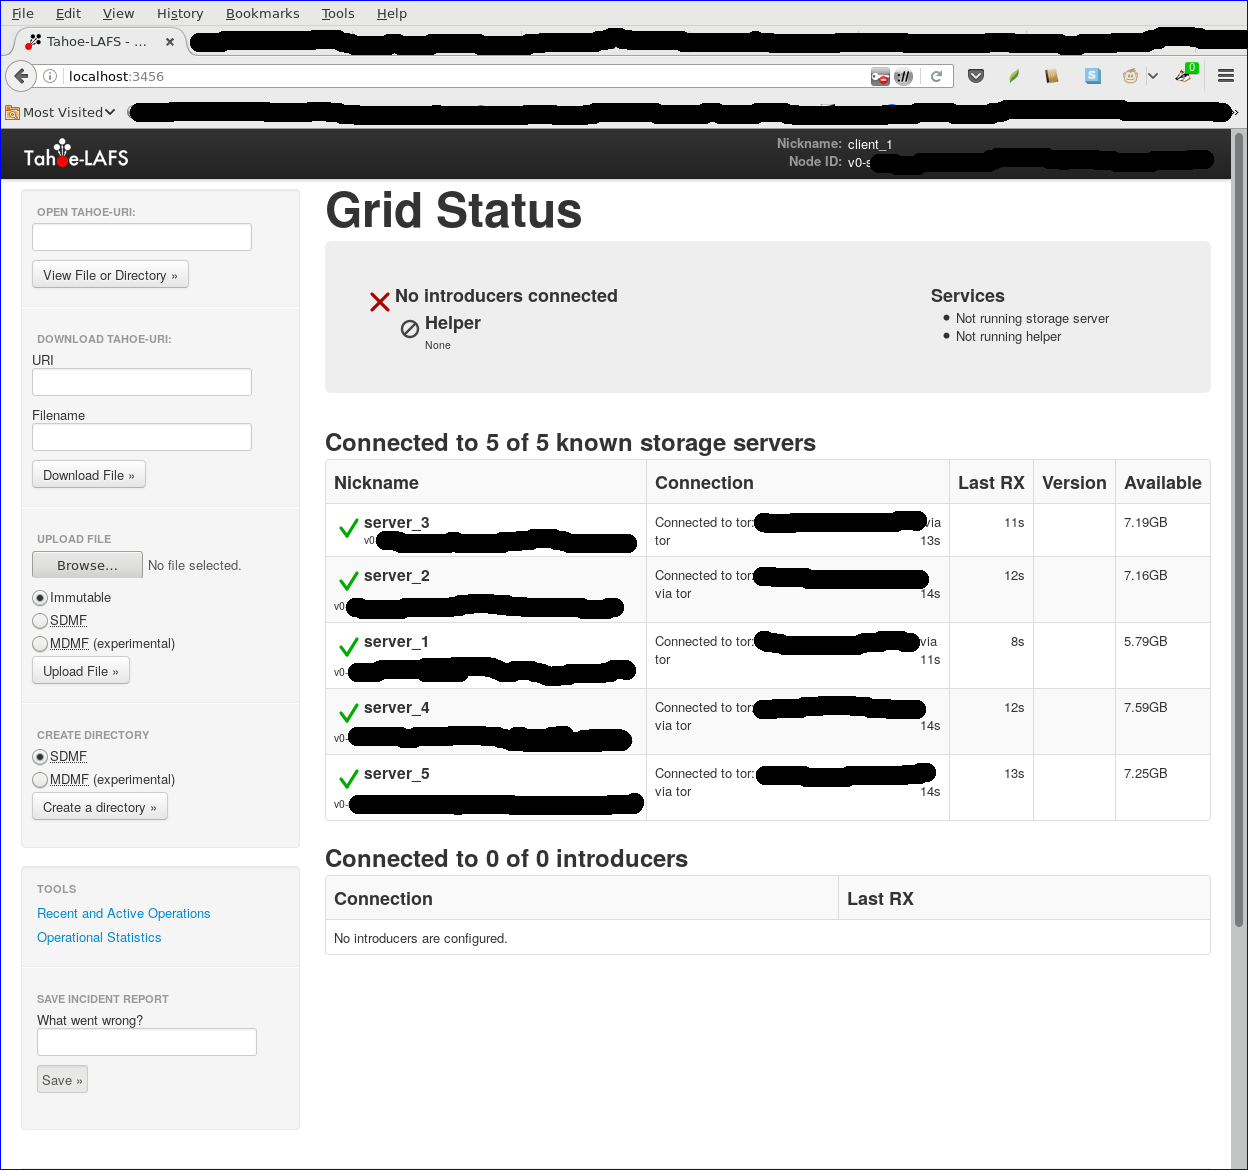
Browse to localhost:3456 and you should see your new grid connected!
Note added 1/30/2017
After I posted this note, a reader on the #tahoe-lafs channel on freenode pointed me to a pastebin by him that summarized the format for the servers.yaml file nicely. You can read his discussion here.
Setting up a Cloud at Cost node with a fresh Ubuntu image
This file documents how to install a fresh ubuntu image on a CaC node. The ubuntu image is taken directly from ubuntu.com. However, they only provide images over http (not https).
It also documents how to set up full-disk encryption with remote unlocking via ssh.
I used several good references to develop this set of instructions. They are listed at the bottom of the page.
I would also note that none of this material is particularly CaC specific. Rather, the approach will apply to all modern Ubuntu server installations.
Install a fresh Ubuntu image
Get the mini.iso for the desired distribution:
wget -c "http://archive.ubuntu.com/ubuntu/dists/<desired_dist>/main/installer-amd64/current/images/netboot/mini.iso"(here <desired_dist> is e.g. yakkety)
Mount the mini.iso as a loopback on your local system.
sudo mount -o loop mini.iso /mntCopy /mnt/linux and /mnt/initrd.gz to a webserver someplace.
cp /mnt/linux /var/www/linux
cp /mnt/initrd.gz /var/www/initrd.gz
On the CaC node (built according to standard procedures), download the linux and initrd.gz files to the /boot partition.
wget -c "https://<your_web_server>/linux"
wget -c "https://<your_web_server>/initrd.gz"
Open up a console to the CaC node from panel.cloudatcost.com. Steps 6-11 need to be performed on the console.
Reboot the CaC node (click the alt-ctl-del button in the upper right of the console screen) and hit escape several times to stop at the grub2 screen on the console. Then enter "c" to get to the grub prompt.
At the grub prompt, enter the following:
grub> linux /linux
grub> initrd /initrd.gz
grub> boot
This will boot you into the ubuntu installer. Follow the installation process using the node's network parameters from the CaC panel.
When prompted to repartition the disk, go ahead and repartition using full disk encryption. You will need to enter a password for the FDE. Go ahead and enter a throwaway password. This will be replaced later once the secure FDE boot process is established.
At this point, install only the system utilities packages (already marked for installation) and the openssh-server packages.
Complete the installation. Reboot the node, type the FDE password into the console to decrypt the disk.
You now have an original ubuntu image installed. You can ssh into the node and do work. However, you will have to decrypt the FDE disk at boot time via the (unencrypted) console each time you reboot. This is problematic for two reasons: 1) console access is easily lost, and 2) the FDE password is sent in cleartext over the network.
Set up remote FDE decryption
To set up secure FDE decryption via ssh at boot time, follow these steps on the CaC node:
Install the dropbear and busybox packages.
sudo apt-get install dropbear busybox(required on ubuntu yakkety, maybe others) Copy the /bin/busybox binary to /usr/lib/initramfs-tools/bin. This is required because the binary in /usr/lib/initramfs-tools/bin does not work with the current unlock script.
sudo mv /usr/lib/initramfs-tools/bin/busybox /usr/lib/initramfs-tools/bin/busybox.orig
sudo cp /bin/busybox /usr/lib/initramfs-tools/bin/busybox
Copy the system's ssh server keys to /etc/dropbear-initramfs, converting them to dropbear format in the process. Also, remove old dropbear keys.
sudo /usr/lib/dropbear/dropbearconvert openssh dropbear /etc/ssh/ssh_host_ecdsa_key /etc/dropbear-initramfs/dropbear_ecdsa_host_key
sudo /usr/lib/dropbear/dropbearconvert openssh dropbear /etc/ssh/ssh_host_rsa_key /etc/dropbear-initramfs/dropbear_rsa_host_key
sudo rm /etc/dropbear/*key
Create a /etc/dropbear-initramfs/authorized_keys file containing the public key(s) that you want to authenticate to the CaC node with when decrypting the FDE.
sudo vi /etc/dropbear-initramfs/authorized_keys
...
Edit /etc/initramfs-tools/initramfs.conf and add the following line after the DEVICE= line (using params from the CaC panel for this node).
IP=<server ip address>::<gateway ip address>:<netmask>::<ethernet device name>:nonee.g
IP=192.168.122.192::192.168.122.1:255.255.255.0::eth0:noneUpdate the initramfs.
sudo update-initramfs -u -k allReboot the node and test the ssh connection:
ssh -i /path/to/your/private/key root@<cac_ip_or_fqdn>You should be prompted to type "cryptroot-unlock" and enter the FDE password.
Once the decryption is successful, type "exit" to allow the CaC node to reboot.
Change the FDE password
At this point, you can reboot your CaC node securely. However, you should change the FDE password. To do this:
Add a new key to the luks partition.
sudo cryptsetup luksAddKey /dev/sda5Delete the old key from the luks partition.
sudo cryptsetup luksRemoveKey /dev/sda5Next time you reboot, you can unlock the FDE with a fresh password that hasn't been sent to the console over the network in the clear.
Important Reminders
The dropbear ssh private key is stored unencrypted in the initramfs. As a result, it is possible for anyone who has physical access to the disk to copy the ssh key and spoof the node.
While the node is running, the luks disk encryption key is stored in ram. As a result, it is possible for anyone who has physical access to the machine to copy the encryption key and decrypt the disk image offline. The only way to assure this does not happen is to maintain physical security over the node hardware at all times. This is a problem with all vps installations, and not just with CaC.